Of course as always there is a TLDR thing somewhere down there. I come across this from time to time and I normally forget all about it…then I just end up always using css (come on I can not be the only one)
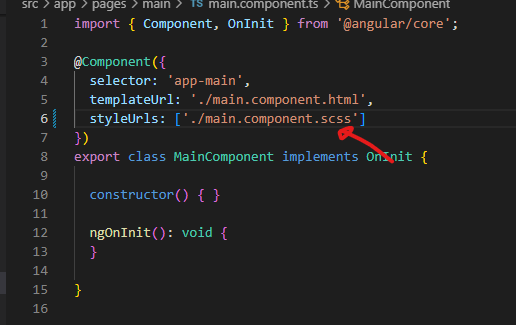
Lets get to it, you have either built or going to build an angular project. In the past i have seen it ask and say “you wanna css, scs,s sasax and …” other options. so i’d normally select scss and then it just worked.
TLDR COMMAND FOR ANGULAR PROJECT ALREADY BUILT If you have already built an angular project then run the following line of code.
ng config schematics.@schematics/angular:component.style scss
When you are starting you just don’t know what you can do at times. I have been in a situation where I already have a file on where I want to put my new Angular project but sadly my folder structure gets messed up completely.
POST note: You will need to have installed the Angular CLI first before doing this step.
So use this command line below to create an Angular project and place said project into a specific directory of your choosing:
TLDR
ng new angular-project --directory=./new-angular-project-file
This should sort you out. In development its important to keep your work space clean especially your git repo. It doesn’t reflect well if your repo is being reviewed or checked out.
I figure the image would be appropriate for south Africans even though the image is from the Netherlands but thats nether here or there.
ANYWAY
Talking more JavaScript here, a developer may been in a situation where one is needing to change types of a certain variables. This is called type conversion. At times you may be in a position to change a type of variable to get a certain function to execute.
The two ways I know how how to cast a string to a number are the following:
var year = '1985'; // set to string

// for interest or certain validation you can
// use typeof to verify the type,
// will be doing this for the examples below:

console.log(typeof year, year);
// expected output: string 1985

// Variable year has been set to a string now for the magic

// option 1: Casting
console.log(typeof Number(year), Number(year));
// expected output: number 1985

// option 2: Method
console.log(typeof parseInt(year), parseInt(year));

// expected output: number 1985
Lets say you want to change a number into a string, that is also possible using casting as well as the toString() function.
var year = 1985; // declared as a number

// Using typeof to verify the type same as above sample

// will be doing this for the examples below:

console.log(typeof year, year);
// expected output: number 1985

// Variable year has been set to a string now for the magic

// option 1: Casting
console.log(typeof String(year), Number(year));
// expected output: string 1985

// option 2: Method
console.log(typeof (year).toString(), (year).toString);

// expected output: string 1985
This happens from time to time when you are setting up a new machine or getting a new machine or a machine has just gone broke. Now you have to login with your credentials every time…no thank you!
So seeing that I have had to dig around a few times I decided to take my own notes to know where to go
How to check your current git credentials or if you have one
git config --list
Now you’ll either see a load of details or not too much happening in the console(if not much action be sure to install git to your machine first). However look for the user.name and user.email values. they should contain your git username and git email address.
Very important concept to understand, I’ll need to start with some context.
Context of Hoisting
We need to understand the life cycle of code and there are two main phases code goes through. The Creation Phase and the Execution Phase.
When does hoisting happen?
During the Creation Phase, the program will set all the global variables and if there are var variables declared they will be initialized with the value of ‘undefined’, upon the programs Execution Phase this will assign the value officially to the variable if the var is above the invoked function.
MDN definition:
The var statement declares a function-scoped or globally-scoped variable, optionally initializing it to a value.
My understanding of hoisting is:
The process of a variable(var, let, const) declaration a default value of undefined during the creation phase. Functions on the other hand upon starting up of the program are stored in memory source
https://youtube.com/watch?v=Nt-qa_LlUH0
Been through a few tuts and this guy explains it well enough for me to understand
The above tutorial also goes through other important concepts of JavaScript functions and their behavior when invoked.
Merry Xmas and there isn’t a TLDR on this post but there is an angular 10 git project repo below! stay safe wear a mask properly and take care of yourselves.
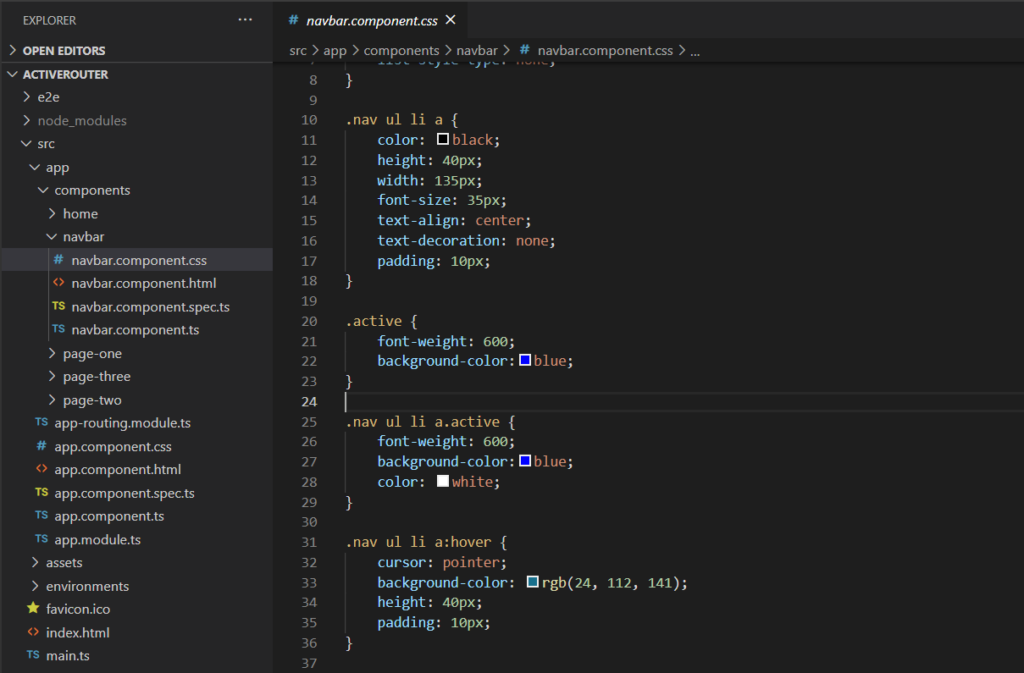
I assure you that this is easier than you think it is. Firstly you’ll need to add the active rout class to your css or scss,
I’ll be honest I went a bit overboard with the styles but ya its for demonstrative purposes I swear
Side Note I would love some feedback on if my image snippets are helpful or readable. You want to place some code in your style sheets for the active state style.
.nav ul li a.active {
    font-weight: 600;
    background-color:blue;
    color: white;
}

// or just simply
.active {
     font-weight: 600;
     color: white;
}
You want to import this active router functionality into this project so go to your project modules. This snippet is in the context of my project by the way so just note the RouterModule.
import { BrowserModule } from '@angular/platform-browser';
import { NgModule } from '@angular/core';

import { AppRoutingModule } from './app-routing.module';
import { AppComponent } from './app.component';
import { HomeComponent } from './components/home/home.component';
import { PageOneComponent } from './components/page-one/page-one.component';
import { PageTwoComponent } from './components/page-two/page-two.component';
import { PageThreeComponent } from './components/page-three/page-three.component';
import { RouterModule, Routes } from '@angular/router';
import { NavbarComponent } from './components/navbar/navbar.component';

const routes: Routes = [
  { path: 'home', component: HomeComponent },
  { path: 'page-one', component: PageOneComponent },
  { path: 'page-two', component: PageTwoComponent },
  { path: 'page-three', component: PageThreeComponent },
  { path: '**', component: HomeComponent }

]; // sets up routes constant where you define your routes


@NgModule({
  declarations: [
    AppComponent,
    HomeComponent,
    PageOneComponent,
    PageTwoComponent,
    PageThreeComponent,
    NavbarComponent
  ],
  imports: [
    BrowserModule,
    AppRoutingModule,
    RouterModule.forRoot(routes)
  ],
  exports: [RouterModule],
  providers: [],
  bootstrap: [AppComponent]
})
export class AppModule { }
Note the export and imports above, be sure to place it in the correct style sheet. From there active your navigation styles tags like so.
Npm install and make sure nothing is missing and you should be well on your way with the active styles triggering per active link match. For a working example checkout my github project.
For a deeper implementation referencing parents and ancestors please be sure to take a look at the following post.
The sticky footer. If you have been searching for a while then i think you know what a sticky footer is by now (if not here is a good explanation of one. The challenge is that there is no short way of doing “position stay down please” like so:
position:stay-at-the-bottom-please-thanks-k-bye
You sadly need to know what is going on and what other components/elements are invovled in order to get the position of the footer right at all times…sticky footer style kinda times.
So we now know that there is no one position solution and no position: “sticky” is not an option<insert sarcastic tone>
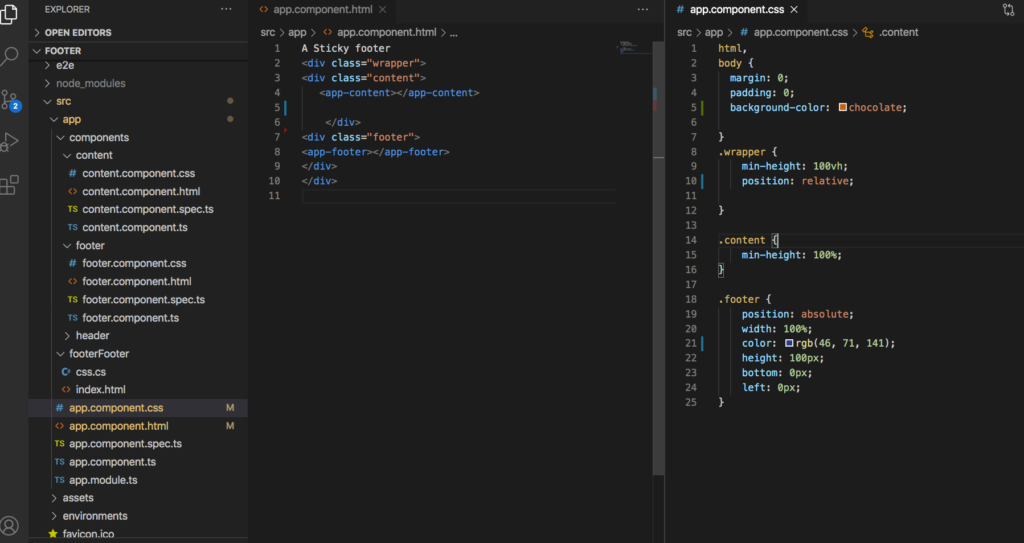
please note the styles, the colors are horrible.
I tried with the min-height set to 100%, but no dice for me for some reason. The sticky footer is a tricky concept to catch. You need to understand the position property and also its relationship with the absolute position.
Think of the absolute position… its relative to the other style/component overall position.
(had to add a pause when proof reading the sentence)
If this doesn’t work..i would only imagine that the scope of your relative element is not aware of the style that has the position of absolute. Its ….relative to your project and how its structured.
The margin and padding being set to zero is to make sure that the “min-height” takes on the full page. In some cases you may not want to have a scroll bar showing when the page is blank.
TLDR
Of course this is what worked and made sense to me i’m open to update this post or remove it entirely 🙂 have a great evening. (Yes this is a repost on a footer topic that i tried to cover and understand and to which i didn’t understand, so this should work i’m sure of it)
html, body style updates is to ensure that the wrapper class takes in the whole screen size without padding
.wrapper has that min-height: 100vh (100% of the view height of the screen/device, position is relative, think of it as a note of where this element is
.footer position absolute, accordance to the relative positioned element bottom and left refers to setting the element relative to the other element and place element at the 0th bottom left px of the screen…of the element
Sadly i only have an angular sample project, but it is better than nothing and the results stay the same this uses basic css and works on IE so.. apparently flex box and sticky footer doesn’t work for IE so i could be corrected on this.
TLDR below, as for now work has been more challenging and only now i’ve started working on some personal projects..well just project.
To become more familiar with firebase I went through this tutorial and it gets you up and connected. Also shows you the basic crud calls which is handy.
I started a new project and tried to follow the tutorial and I wanted to firebase init but the command was not found. Seeing that i’ll probably come across this again i have decided to make a lil dev note on this.
TLDR
Macbook:projectName tony$ firebase init
 -bash: firebase: command not found
Macbook:projectName tony$ npm install -g firebase-tools
Install firebase tools globally by installing the following rpm package
npm install -g firebase-tools
There is also a chance that you are not signed into firebase yet. The terminal should prompt you to run “firebase login”.
firebase login
After successfully logging in you can run the following command
// Lists country flags
<div *ngFor="let country of countries">
      <ul>
        <li class="item">
          <a class="flag-icon flag-icon-{{ country.code }}"></a>
          {{ country.name }}
        </li>
      </ul>
    </div>
// Hardcode flag
<div>
 <a class="flag-icon flag-icon-za></a>
</div>
The above sample code will list some flags that have been populated by the countries array. Here is a countries array I made you can use to get started.
Hello and welcome back there is a TLDR section with steps below…
Ever been working hard on a feature to only realise that there have been some major updates on the Develop branch or even worse depend on a completed feature that is currently on the dev branch (well that is just worse for me in any case)
So you are working on Feat/01 branch which you have branched off develop (a while ago) , but then as you try to merge your code…boomy you get a merge conflict. This does tend to get a bit tricky depending on what sections or components of the app you are working on.
So you need to get your branch up to date with the dev code cause you need it to finish the feature..or you’ll hit some merge conflicts. To Merge the updated code into your feat/01 branch, how you do that?
Well, via the command terminal. Here are my steps that I would take.
TLDR
// Currently on feat/01 branch
// Step one
git fetch origin // This will get the latest code from the repo
// Step two
git checkout develop // or switch to the branch with the latest code
// Step three
git pull // This will pull the latest code that is on the develop branch
// Step four
git checkout feat/01 // check into the branch you want to merge to
// Step five
git merge develop

// this will merge develop's latest changes INTO feat/01 branch
There will also probably be some merge conflicts which should be simple to tackle depending on what tools you are using. To resolve merge conflicts I normally use the Visual Studio code text editor to sort out incoming changes(incoming from origin) and current changes(changes from your local) or git tortoise which has a whole ui for merge and resolving conflicts(I know that there are many others for sure). Just go through each conflict step by step and there you have it. you are more or less inline with Develop and you have included all your changes so you can keep on cracking forward.