Angular: Unit Testing with Services and how to mock ’em

Ok, if you don’t know anything about Services this post is not for you JUST yet. Learn about em and come back here…if you wanna.

For those that made it past my first two lines and continued, we all know that services handle API calls and make real requests. Testing code that requires a service would normally need to receive or send data. You do not want to make real calls, you want to run this unit of code in isolation with no external dependencies. Unit tests normally run with CI (continuous Integration). It is just not feasible to make real API calls (with the chance of failing or taking long time for responses and potential failures). So the question that you want answered is, How to mock API service calls for unit tests?

I have recently come across this problem seeing that I am an official FrontEnd developer (this has happened basically 4 weeks ago still fresh) and one of my duties is to create unit tests for my work. I did some basic assertions which worked fine but there came a problem when it came to requiring a service to unit test my code.

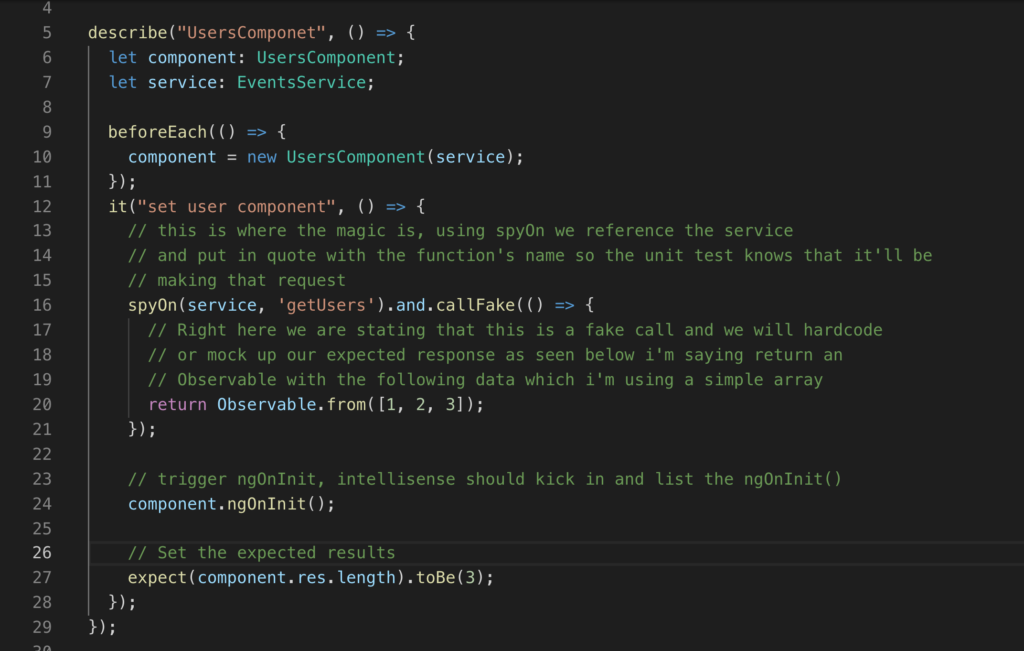
Let’s provide some context. You have a service called EventsService right, this guy has a method/call called getUsers. Simple. Now in the component that you are working with you need to import the EventsService to use that getUsers call for your unit tests as well as import the component you are unit testing.

So you use this guy(above) that makes the getUsers() method that is provided from the eventService upon the component’s ngOnInit() as seen in the image (still above).

With the code above this will make the request and return an observable which you can see we are subscribing to and initialising. So let us get to our spec component.

Added some comments for each step, sorry i know that there is a bit going on in this post. I tell ya explaining context is quite a challenge.

So you have declared and imported what services you need, and from there use spyOn to return an observable and set the data you wish to return, after that you would trigger the ngOnInit() from your component. There you have it, you have successfully faked an API call to return data that is to your liking and forming it at your will

Ideally the flow with unit testing is to use the 3 A rule

  • Arrange
  • Act
  • Assert

in the example i’ve been going on about, you can see that the first step was to arrange that service to provide mock data, the act would be to trigger the ngOnInit() from my users component and then Assert to see if the expect results are true.

Of course i am a newbie at this and i’ve i’m completely wrong please feel free to comment and point me in the right direction. Of course there are many way to peel a banana.

the Above examples is using Karma + Jasmine and Angular framework.

Angular Toast Notifications, quick! (for newbies)

Alright alright, it has been a long time. Now it’s time to take you through how to add a toast notification and fast.

The quickest and easiest way I could find was using this lil npm package from ngx-toastr is what you need for a quick and simple implementation.

Following the guide and going through the steps its pretty straight forward, but if you are having any troubles like i have…on that one time, i’m happy to share my findings.

Step one:

npm install ngx-toastr --save
// and if you already have it installed
npm install @angular/animations --save

Cool so let that little console run. Once installed be sure to add the imports to your app module like so

Add them imports to your app.module.ts

As you can see I have added something a little extra to the ToastrModule.forRoot({}), in those brackets you can do a number of tricks, adjust positioning animation and the works here are some details

and there are a number of options more

Now you need to add the stylings so the app knows how to make your toastie look good, check out your styles.css the main one ya’ll know what i’m talking about. You have a number of styling imports. This is where you need to be a tiny bit careful and note what style libraries you are using is it Bootstrap? Angular material? is it something else? Luckily we can do an import for whatever your style framework that you have implemented.

// regular style toast 
@import '~ngx-toastr/toastr';
 
// bootstrap style toast 
// or import a bootstrap 4 alert styled design (SASS ONLY) 
// should be after your bootstrap imports, it uses bs4 variables, mixins, functions 
@import '~ngx-toastr/toastr-bs4-alert';
 
// if you'd like to use it without importing all of bootstrap it requires 
@import '~bootstrap/scss/functions';
@import '~bootstrap/scss/variables';
@import '~bootstrap/scss/mixins';
@import '~ngx-toastr/toastr-bs4-alert';

So the problem i was facing was that i have implemented the toast notifications and all but they were not displaying. Turns out i was not using the correct toastr import styles. So lil lesson for me be sure to take note on what styling framework/libraries you are using. I used the regular toast implementation.

For my implementation of the toast notifications i wanted to add it as a service/shared component so it can be reused throughout the app..well “web-app” I am making, it looks a lil something like this (toast-message.service.ts).

import { Injectable } from '@angular/core';
import { ToastrService } from "ngx-toastr";

@Injectable({
  providedIn: 'root'
})
export class ToastMessageService {
  constructor(private toastr: ToastrService) { }
    showSuccess(text: string, title: string) {
        this.toastr.success(text, title);
    }
    showFail(text: string, title: string) {
      this.toastr.error(text, title);
  }
}

this way i’m able to inject this service into the constructor and utilise my toastie notifications for both success and error scenarios also having the freedom of adding my own text for the success/failure situation.


import { ToastMessageService } from "../../services/toast-message.service";
export class SomeCoolComponent implements OnInit {
  constructor(private toastr: ToastMessageService) {}

ngOnInit() {
this.toastr.showSuccess(
           // Body content of toastie
           "Has been successfully created.",
           // Header of toastie
            "A Toast notification"
          );
this.toastr.showError(
           // Body content of toastie
           "Has been successfully created an error.",
           // Header of toastie
            "A Toast notification for the masses and friends"
          );
}
}

I think that that about does it. This should be quick and simple, my project is running Angular 7. Lemme know if you come across any issues.

Adding bootstrap to a new Angular Project

Such a long time since i’ve made a post I know I know.

So my learning on React has slowed down a bit. This is due to the fact that I have to get to my head wrapped around Angular now. Exciting times as always shifting and changing.

I’ve been coming across a problemo when starting a new project there is no bootstrap and I’ll be honest here, i keep forgetting how to add it. So here is a lil step by step on how to add Bootstrap stylings to your new Angular project.

I am assuming that you have already done the whole

ng new CREATESOMENEWANGULARAPPTH....

This is not quite the name of the project i made, but still lets continue on how to fast track some bootstrap styles shall we.

first you need to install it as a dependency via your console with npm, just pot this little sucker in.

npm install ngx-bootstrap bootstrap --save

Just watch that puppy install itself and now we get on to the next step. So if you have a look into your angular.json file you’ll see that it does reference some stylings to your styles.css file that is auto generated when making the project as seen in the image below:

This is a good start, now all ya gotta do is add an import in that “styles.css” file here pot this in

/* add this to your styles.css file found in your project src
@import "~bootstrap/dist/css/bootstrap.css";

Now stop the console and redo the whole “ng serve” move and that should sort you right out. Hope this helps you cause now i don’t need to re-remember how i pulled this off.

happy bootstrapping with your angulars

POST EDIT:
If you want the modules for the @ng-bootstrap/ng-bootstrap, use the following command to install this package, Loads of functionality that is bootstrap related

npm i @ng-bootstrap/ng-bootstrap

How to fix 404 not found error failed to load favicon.ico

I was hunting around the net for a solution to this little bugger. The solution i found is quite a simple one. If there is a better way, be sure to let me know in the comments. Here is a step by step on how to fix this issue.

Note the file structure and the index.html within the src folder

You want to open up your index.html within your src folder and in your <Header /> tag and add the following:

<link rel="shortcut icon" href="../src/assets/img/favicon.ico">

It should look a little something like this your index.html

using the link tag, this should render your favicon

I believe that it is best practice to use an ICO formatted icon for cross browser functionality. If using a png, you can use just about any online ico converter.

Unit testing with Enzyme and Jest and How to

You had a taste of what its like to set your React project up with unit testing and now you want some more?

Where to start, I think for this particular post I’ll demonstrate how to do some simple assertions and check conditions to be true. If you want to have a more in-depth go, just give a clicky here.

I know that each project is different and unit tests check for a number of things, I was told that there are essentially three steps, define your variables, add your conditions and check whether they are true. Before we tackle the above steps, we’ll need to add some data-tags in our js so that we know how to locate each element for sure (instead of using css/xpath or jquery).

You know what elements to unit test against, be sure to add data tags, should look something like this.

i’ve added some qa data tags

Cool, so we have our data tags all set, now its time to add our *.test.js file, be sure to name it nicely so everyone can know what component this test script is testing.

Now you have a nice new blank [COMPONENT_NAME].test.js file, first step is to be sure to import what you need to make this unit test run for the hills

gotta add your imports (these guys should be available after setting up for unit testing

import React from 'react';
import { shallow } from 'enzyme';

you will also need to import the component that you are unit testing against, so in my case it’ll be the following

import Weather from './Weather';

Now in my weather component i do have a few variables that get populated by an API, so in this case i’ll be mocking them values and giving them a default value due to these values can change depending on the API responses.

const C_TEMP = 'C_TEMP';
const LOCATION = 'LOCATION';
const WEATHERNAME = 'WEATHERNICENAME';

You guys are still with me right? just hold on so now we are going to actually write our first unit test…. in fact i think that this was my first unit test that i’ve ever wrote, hence why its not quite perfect.

the syntax is more or less the same structure when creating a unit test with Jest, you will add a short description on what the unit test is actually testing, kinda like below, i’ll add some comments in below to break it down exactly what it is I’m doing:

1 test('should render a `location to exist`', () => {
2    const wrapper = shallow(<Weather
3        location={LOCATION}
4        cTemp={C_TEMP}
5        WEATHERNAME={WEATHERNAME}
6    />);
7    const expected = true;
8    const actual = wrapper.find('.location').exists();
9    expect(actual).toBe(expected);
10 });

line 1: Adding a description for my unit test, so i’m essentially checking if the element exists.
line 2 to 6: Declaring a const using Enzyme’s shallow function to render the element on its own without worrying about the parent/child structure, so i’m rendering on the weather component with the variables i’m expecting
line 7: I declare a const as my expected conditions, so i want this existence to be true
line 8: Now to state what is actually happening, so i’m saying in the wrapper i expect location className to exists.
line 9: Lastly, here i’m simply stating that actual results to equals to expected
line 10. Closing the unit test

Excellent, in your package.json you should have the ‘test’ script with the following config 

"scripts: {
"test": "jest --config=./jest.config.json --coverage",
},

if you have made a couple of assertions and unit tests, when executing npm test this should run all your unit tests, and you’ll get a pretty graph at the end of it and it should look something like this

So i have added some additional unit tests as you can see by the results table, one of my unit tests actually render my first unit test (does this element exists) redundant, cause if it didn’t exists my other unit tests would not pass…so sometimes things like that happen when you have to keep things dry (don’t repeat yourself). Let me know if you were able to get your first unit test running.

This blog post took me a bit of time to write, so if you are facing any problems please let me know and i’ll see if I can assist. I’m not saying that i’m the best and i know everything , but this is what worked for me.

thanks again for reading, catch you next time.

Unit testing with Enzyme and Jest and Setting up

{/* Before I begin this post is just a how to setup up your project to run unit tests, i’ll probably go over some examples of actual unit tests in a later post. */}

Hello again

So you’re wondering how to make some sweet Unit tests, well so was I. Spoke to my FrontEndFriends, got some high level guidance and I gave it ago to implement it myself.

Here is how to setup up your project with Jest and enzyme.

First thing you’ll need to do is install jest, enzyme and enzyme-adapter-react-16 as a `devDependency`.

So go on install that sucker using npm install jest, enzyme and enzyme-adapter-react-16

npm install jest enzyme enzyme-adapter-react-16 --save-dev

Once all the little packages are installed, you will need to setup the following below.
– add a test-setup.js file
– Add the test-setup.js file to jest.config.json

What does this test-setup.js file need and where does it go? You can use my project as a reference. I made a folder called .jest and added two files:
– shim.js
– test-setup.js

You might be asking “what the heck is a shim folder and what is it doing here?” If you don’t have this file your application starts to complain, so to stop the whinging you’ll need a shim.js in your .jest folder.

Luckily shim.js just consists of the following code:

global.requestAnimationFrame = (callback) => {
setTimeout(callback, 0);
};

Finally, we get to add our test-setup.js here is how mine looks:

// eslint-disable-next-line import/no-extraneous-dependencies
import { configure } from 'enzyme';
// eslint-disable-next-line import/no-extraneous-dependencies
import Adapter from 'enzyme-adapter-react-16';
configure({ adapter: new Adapter() });

The comments are optional of course.

Now for the next step, that is take test-setup.js file add it to jest.config.json. So navigate to your root directory (where you see all your friends such as package.json and what not and create a file called jest.config.json and add the following code:

{
"verbose": true,
"testURL": "http://localhost/",
"moduleNameMapper": {
"\\.(css|jpg|png)$": "/empty-module.js"
},
"setupFiles": [
"/.jest/shim.js",
"/.jest/test-setup.js"
]

Once all is said and done, add this little guy to your package.json to make running unit tests just a little bit easier

Add a script for `jest`: `jest –config=./jest.config.json –coverage`

Now you should be fully setup if you are running into any problems these references should add some extra guidance happy unit testing!

If you want to do some more reading on unit tests feel free to check out these references:
Jest
Enzyme