Angular 13: How to make a clickoutside Directive with RXjs

Going outside with clickoutside directives

Hi all, it has certainly been a while, even though the only comments I get are from bizarre spam bots. As always there is a TLDR for you down below. So lets get into it.

Have you ever been in a situation where you make a lovely custom dropdown menu for someone and you do not know how to close the dropdown when you or they click away?

Well this is where a directive comes in and we even get to use fancy Rxjs in the mix.

Directives are defined as classes that can add new behavior to the elements in the template or modify existing behavior.

First off you will need to create your directive would recommend using the Angular CLI tool on this one.

// Angular generate new service
ng g s servicename

[Pro tip]: If you are unsure where the CLI tool will place your directive you can use the extension –dry-run.

We will be using RXjs in this directive to listen to the clicking of the element outside the assigned element

TLDR here is the Directive code to handle the clicking outside directive. Be sure to declare the Directive in your module that you are using said directive.

import { DOCUMENT } from "@angular/common";
import { AfterViewInit, Directive, ElementRef, EventEmitter, Inject, OnDestroy, Output } from "@angular/core";
import { filter, fromEvent, Subscription } from "rxjs";

@Directive({
    selector: '[appClickOutside]',
})

export class ClickOutsideDirective implements AfterViewInit, OnDestroy {
    @Output() appClickOutside = new EventEmitter<void>();

    documentClickSubscription: Subscription | undefined;

    constructor(
        private element: ElementRef,
        @Inject(DOCUMENT) private document: Document,
    ) { }

    ngAfterViewInit(): void {
        // you are listening for a click anywhere on the document
        this.documentClickSubscription = fromEvent(this.document, 'click')
            .pipe(
                filter((event) => {
                    // the Rxjs filter will return when a click is not within the directive element
                    return !this.isInside(event.target as HTMLElement);
                }),
            )
            .subscribe(() => {
                // upon the case of element clicked outside the subscription will be emitted
                this.appClickOutside.emit();
            });
    }

    ngOnDestroy(): void {
        this.documentClickSubscription?.unsubscribe();
    }

    isInside(elementToCheck: HTMLElement): boolean {
        return (
            elementToCheck === this.element.nativeElement ||
            this.element.nativeElement.contains(elementToCheck)
        );
    }
}

How does this directive work?

The finer detail is that the subscription is being used to subscribe to specifically where the user is clicking on the document. The pipe contains a filter which checks if the user has clicked off the element or on the element, this is where we subscribe to said subscription to when the event has been clicked outside the element. The emitter will emit the appClickOutside emitter.

I don’t care how it works, what else must I do to get this setup in my project!

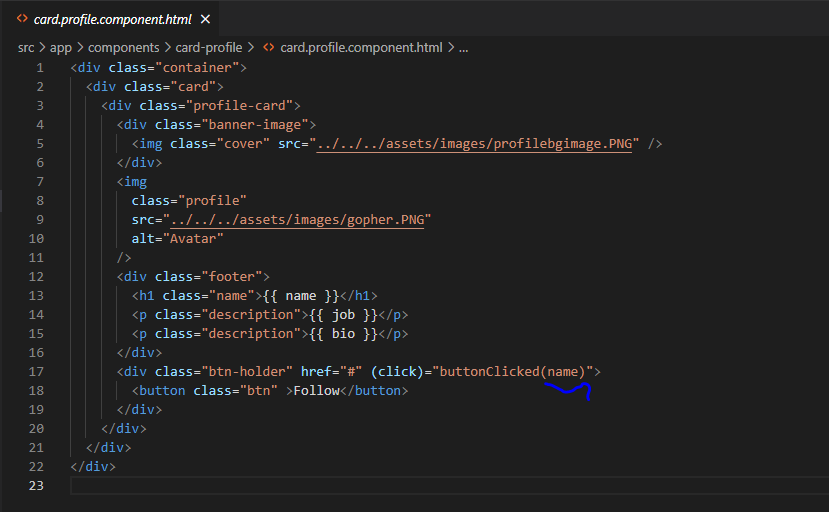
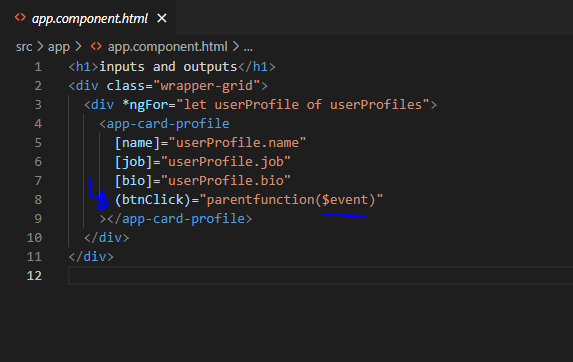
Assuring that you have created your directive and have declared it in your module next you will need to update the view. On the view of your component you will need to add the appClickOutside directive to the element that wraps around your custom dropdown menu, as you can see on line 2 I have a dropdown wrapper class to ensure that I have the area of the dropdown covered so you may need to specify the height or width depending on your layout.

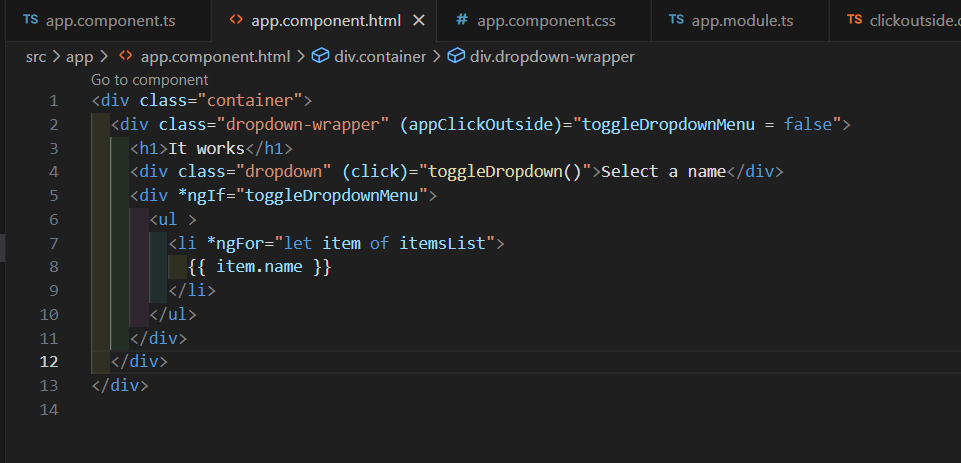
If the click off is not quite working, I’d advice to take look at your styles and element wrapper.

Ya that is about it. Feel free to take a look at my working sample on github if you are facing any challenges

REACT troubleshooting: Array.prototype.map() expects a return value from arrow function

Loving message

Turns out when using a map within a React component and returning a list of components you need to wrap the return in () parenthesis as oppose to using the common {} curly brackets.

your imports and function code and useState above...
.....
.....
.....

FIX: NOTE With paratheses ()

  return (
        <div>
            <Card className='expenses'>
                <Filter selectedDate={filteredYear} 
                  dateSelectedHandler={onSetFilterHandler} 
                 />
                // NOTE paratheses used here. ( ) 
                {filteredResults.map((expense) => (
                    <ExpenseItem
                        key={expense.id}
                        title={expense.title}
                        amount={expense.amount}
                        date={expense.date}
                    />
                )
                )}
            </Card>
        </div>
    )

Below FAILED IMPLEMENTATION: 
 return (
        <div>
            <Card className='expenses'>
                <Filter selectedDate={filteredYear} 
                dateSelectedHandler={onSetFilterHandler} 
                />
                // This code will fail to understand what you are returning 
                // when using the curly brackets { }
                {filteredResults.map((expense) => {
                    <ExpenseItem
                        key={expense.id}
                        title={expense.title}
                        amount={expense.amount}
                        date={expense.date}
                    />
                }
                )}
            </Card>
        </div>
    )

I found this solution on stackoverflow flow and also verified it in the tutorial I am following.

I have just started learning React framework so i’m going to list and post all the niggles I come across or silly mistakes I made. Good luck and keep learning.

Angular how to make reuseable components with @Output Part 2

If you have read my first post covering @inputs then be sure to give that a quick read before continuing.

In the previous post we have covered all our inputs and you might be thinking what about @outputs, well lets make one. When you have an @output it would emit a value up to the parent component, I believe there are many ways to do this, but all I’m trying to say is that @output requires at least an emmitter. As seen in the card.profle component. (picture below).


Update the following code in the app.component.ts file:
  data = [
    {
      name: 'Jonny Doe',
      job: 'FrontEnd Gopher',
      bio: 'I am a Gopher that likes to FrontEnd Gophe',
    },
    {
      name: 'John Dear',
      job: 'Dear FrontEnd',
      bio: 'I am a Dear that likes to dearly FrontEnd',
    },
    {
      name: 'Tony Tones',
      job: 'FrontEnd Developer',
      bio: 'I am a Tony Tones,I use JavaScript, TypeScript and Angular Framework',
    },
  ];

  ngOnInit() {
    this.userProfiles = this.data;
  }

Refresh and you should have 3 loverly gophers staring at you.

In this example we will link the follow button to emit the username of the profile selected to the parent component. This exercise we will use the eventmitter to help us emit the profile name selected to the parent component.

Line 13 we have our @output named btnClick connected to our new eventEmitter of type string (for our name variable).

We use the buttonClicked() function and pass the variable name in the buttonClick(name), which we have declared in our cardprofile component and the next step is to link it on the app.component.html and you can see the emitter btnClick.

And finally to add the function in the app component

Now spin up the project and open the dev tools and click on one of the profiles.

Here we are console logging the profile username to the parent component and thats about it.


Feel free to fork my github, here is the source code.

Code review notes

learning the ropes

As always there is a TLDR section highlighted in bold.
These are just my personal notes and some tips and tricks I have picked up from my peers in my current job and naturally very open to any feedback on my topics I post.

Code Reviews


Now, I would normally use the prettier formatter to organize my code, but at my job I was advised not to do that due to some of the code being in a layout that is easier to read and work with. My auto formatter happens to mess it up, so I started to check my code format by eye, which is far from efficient and takes a bit of time ..sometimes. I just felt I had to share why I cannot just use a auto formatter.

Check list

TLDR

  • Use your editor search for console logs and remove ’em
  • Also removed unused code/imports to your project
  • use ESLint and make sure it passes (this is my next post trying to set it up now)
  • Run your unit tests, I’ve had my review approved and be denied by unit tests failing
  • Important make sure your naming conventions make sense so other developers can follow
  • Personally I think it is perfectly fine to leave commented notes on certain methods that are helpful! Such as // This section cleans up the goods and returns so and so
  • Create the PR ( Peer Review/ Merge Request..etc) and go through the comparison. The layout shows exactly where changes have been made and I tend to catch a lot of my syntactical errors at this point.

That’s all I have for now, these tips came from my colleagues and also through my own experiences. Checking is good but checking only once is even better.
Good luck and I hope to hear some comments on this one.

JavaScript Changing types from string to number

Jamerson

I figure the image would be appropriate for south Africans even though the image is from the Netherlands but thats nether here or there.

ANYWAY

Talking more JavaScript here, a developer may been in a situation where one is needing to change types of a certain variables. This is called type conversion. At times you may be in a position to change a type of variable to get a certain function to execute.

The two ways I know how how to cast a string to a number are the following:

var year = '1985'; // set to string

// for interest or certain validation you can 
// use typeof to verify the type, 
// will be doing this for the examples below:

console.log(typeof year, year);
// expected output: string 1985

// Variable year has been set to a string now for the magic

// option 1: Casting
console.log(typeof Number(year), Number(year));
// expected output: number 1985

// option 2: Method
console.log(typeof parseInt(year), parseInt(year));

// expected output: number 1985

Lets say you want to change a number into a string, that is also possible using casting as well as the toString() function.

var year = 1985; // declared as a number

// Using typeof to verify the type same as above sample

// will be doing this for the examples below:

console.log(typeof year, year);
// expected output: number 1985

// Variable year has been set to a string now for the magic

// option 1: Casting
console.log(typeof String(year), Number(year));
// expected output: string 1985

// option 2: Method
console.log(typeof (year).toString(), (year).toString);

// expected output: string 1985

That is all for today.

JavaScript What is hoisting?

adorable niece

Very important concept to understand, I’ll need to start with some context.

Context of Hoisting

We need to understand the life cycle of code and there are two main phases code goes through. The Creation Phase and the Execution Phase.

When does hoisting happen?

During the Creation Phase, the program will set all the global variables and if there are var variables declared they will be initialized with the value of ‘undefined’, upon the programs Execution Phase this will assign the value officially to the variable if the var is above the invoked function.

MDN definition:

The var statement declares a function-scoped or globally-scoped variable, optionally initializing it to a value.

My understanding of hoisting is:

The process of a variable(var, let, const) declaration a default value of undefined during the creation phase. Functions on the other hand upon starting up of the program are stored in memory source

Been through a few tuts and this guy explains it well enough for me to understand

The above tutorial also goes through other important concepts of JavaScript functions and their behavior when invoked.

JavaScript Keypresses keyup keydown keypress

As Always I try to make my blog cater for peeps that are just looking for concise answers, so if you scroll down there is a TL DR section below. If you are curious of my thoughts then keep reading.

My knowledge of keypresses consisted of the brief summary of “you press a key and you can make something happen”. Turns out there is a bit more to it.

Keypresses have three different trigger points. I’m going to put my naive understanding of them first, then what MDN says cause that is the best source of truth out there in my opinion. I also used StackOverflow.

First you have keydown

My understanding of a Keydown is the action of when the button is pressed, so as the key is pressed down you can set an action or trigger something from that point.

Unlike the keypress event, the keydown event is fired for all keys, regardless of whether they produce a character value.

from MDN

To sum keydown: Keydown will trigger for all keys pressed(odd ones being ctrl, shift. delete..etc). If you press any key thats a keydown.

Second you have keyup

My understanding of a key up is the “release” action of the keydown action. So you can set an action upon lifting your key from a pressed state.

The keydown and keyup events provide a code indicating which key is pressed, while keypress indicates which character was entered. For example, a lowercase “a” will be reported as 65 by keydown and keyup, but as 97 by keypress. An uppercase “A” is reported as 65 by all events.

from MDN

To sum up keyup:. It trigger upon the release of a pressed key. Don’t worry MDN can be intimidating at times. It took me a while, but they are saying a keyup will trigger with a value of what key was pressed. Also, I think MDN has already moved on tooo..

Thirdly the keypress

My understanding: Keypress is the full action of just typing a key. so hit a key and let go and you have yourself a keypress buddy.

The keypress event is fired when a key that produces a character value is pressed down. Examples of keys that produce a character value are alphabetic, numeric, and punctuation keys. Examples of keys that don’t produce a character value are modifier keys such as Alt
, Shift
, Ctrl
, or Meta

From MDN

Ok, so my understanding of a keypress was a bit off. It appears to be including all chars that set a value and not other keys like shift, control, alt…etc that don’t produce a character. According to MDN it appears that the keypress is deprecated so you would just need to be aware of that when using keypress.

I never in my life thought that someone could complicate a key press, but here we are 2020 virus is out. Try to stay inside guys ok.

TL DR

The onKeyDown event is triggered when the user presses a key.
The onKeyUp event is triggered when the user releases a key.
The onKeyPress event is triggered when the user presses & releases a key (onKeyDown followed by onKeyUp).

from stackoverflow

In my defence I’m not as technical as MDN, my theory was around more towards what the stackoverflow post said.

I’ll leave you with that guys I really hope that this helps you out and helps you know that there is a bit more to a keypress than meets the eye.

On a side note. I got some positive comments on my previous post. Thanks so much for the support I’ll continue posting my findings and sharing the knowledge to help myself and others. I was so chuffed in fact i made a live sample of some javaScript and keypresses right here enjoy.

[Sample] Angular hitting API with Service

If you want the sample main steps scroll to the “TO THE POINT” part of this article thanks. If you all good keep reading.

So this lock out isolation thing has been quite challenging for everyone and I feel your pain. I was working on an angular portfolio…but its been mainly css when trying to cater for mobile view and tablet view…so I want to take a break from the css and get into interacting with an API

If you don’t know what an API is…this wont cover the fundamentals sadly, it’ll be a working example of an api request. As for now we are Focusing on Angular working with APIs using services.

There are many free open API sites the one i came across apifootball.com where upon registering they’ll provide you with an API key (you’ll need to keep this safe and secure) From my experience most of the free apis require a registration.

We have an api and an api key, now you want to check and see if we can make a call of some sort and log a response. A great API tool is postman. Basically setup the API call to your liking and it allows you to see and track the response and what not, look its great.

ok so that is the long of it. Now i’m going to try to keep it as short as possible. Yes that does say “overal_league_payed” learned that the hard way.

TO THE POINT HOW TO SETUP TO HIT AN API

Using the angular cli we can just enter the following command in the terminal

// short hand
ng g s serviceName
// full on
ng generate service serviceName

The command will generate a service for you in your solution. Basic boiler plate.

Right now you know your API is working. Let’s make that service in our angular app give that API a call and see if we can get their response.

We need RXJS thats right that beast that does magic with Observables (high level comparison of observables vs promises.).

npm i rxjs

Make sure that you are using HttpClient for the http calls.
I normally use the below structure for api calls. Adding variable for base urls and other things that are constant like my apiKey this is just personal preference.

I was advised that when it comes to services, make sure they only deliver the data keep that part clean. Now moving along to the app.component we’ll need to create a function that hits that service and the getLeagueStand and subscribe to the response and then extract the data you want. Make sure you return the url.

And ALSO do not forget to import your service and the httpClient module to your app.module file like so…I can’t believe I forgot to add this guy.


As you can see in the code above we subscribing to the data and then setting out its values to variables. Here is a repo to a working sample. You’ll need to add your own apikey though.

Understanding EventEmitters [for newbies]

I was trying to figure out how to use eventEmitters, be cause I forgot and I had no clue how to use them anymore. Then I came across this amazing video that shows you how its done.

this guy knows his stuff.

If you don’t want to watch the video or don’t have access to speakers, saving data… whatever, you can just follow along with me and my ways of explaining things to help me understand myself.

So I just want to explain it the best way i can understand it…so this won’t be textbook but it’ll probably just makes sense to me..ok enough disclaimers lets go.

Firstly you want to have an eventEmitter sample you can just go and clone this fella.

git clone https://github.com/tony2tones/eventEmitter-sample.git

There, now you have a project that has some eventEmitter action going down. It’s simple and it is a console log, but it’s the foundation to where we can start to understand whats happening.

Off the bat we can see that we will have a parent and child components to work with.

<app-component></app-component>
<header-component></header-component>

Let’s Navigate to the header component.

Now import Output, EventEmitter and a message to emit.

Maybe i’m going a bit slow, but it’ll pick up quickly i promise.

Now we can use those imports with making a new EventEmitter variable. This is very exciting and for the sake of speed you also added a function that emits the message…Oh also forgot an array of menu options.

Sweet, so we have made an emitterable variable called ‘messageBus’ which will “carry” the message string and emit it world wide.(within the boundaries of your angular project)

So we head on over to our Header view(html) and add the clickHandler function.

So thats officially in our header component…the parent component still doesn’t know anything about it just yet. There is one more step… ok there isn’t but we are close.

So how to we make it available? well you put it over here.

So we linkup that emitter variable called ‘messageBus’ to a function that can be found in our parent component.

Run that, check your console click on the nav and you’ll see the console responding with your emitted message all the way from the child component.

How do I add a Fancy github ribbon, this is the fastest way I know

If you want the story version you can continue reading, if you want to solution i found then skip to the bottom of the page. 😉

I was recently updating my rock paper scissors game to work on mobile sized screens.

The mobile screen adjustments took me some time, because I learned only after i finishing my css, making all my styles for desktop use only. I found out that most people will browse this link via their mobile phones and so my beta was a disaster in mobile views… but i digress.

Anthony Marques 2019

Aaaand when I was done, I was very proud of the results. I even figured lets make this public, so i shared my work of art on Reddit waiting for the likes to come rolling in.

BUT i got flagged for showing off by the mods…which they were more or less correct. I wanted to show the world what i have done, but then they insisted of the following rules:

Only one thing came into mind, i need to add a fork me on github ribbon, it sounded like a sure fire way for my rps game to be accepted by the JavaScript sub. I needed to know how to do this.

Then i came across this little site. This was basically the answer to what I was looking for. I did try to find other ways of implementing it, but i needed a quick solution

<a href="">
<img style="position: absolute; top: 0; right: 0; border: 0;" src="https://s3.amazonaws.com/github/ribbons/forkme_right_darkblue_121621.png" alt="Fork me on GitHub">
</a>

Just update that href with your github site and you are good to go, enjoy forking and sharing.

Here is the end result!

rps game mobile view

Here is a link to the ROCK PAPER SCISSORS game i made your avator which is me takes on real damage. feel free to take a looky