Angular 13: How to make a clickoutside Directive with RXjs

Going outside with clickoutside directives

Hi all, it has certainly been a while, even though the only comments I get are from bizarre spam bots. As always there is a TLDR for you down below. So lets get into it.

Have you ever been in a situation where you make a lovely custom dropdown menu for someone and you do not know how to close the dropdown when you or they click away?

Well this is where a directive comes in and we even get to use fancy Rxjs in the mix.

Directives are defined as classes that can add new behavior to the elements in the template or modify existing behavior.

First off you will need to create your directive would recommend using the Angular CLI tool on this one.

// Angular generate new service
ng g s servicename

[Pro tip]: If you are unsure where the CLI tool will place your directive you can use the extension –dry-run.

We will be using RXjs in this directive to listen to the clicking of the element outside the assigned element

TLDR here is the Directive code to handle the clicking outside directive. Be sure to declare the Directive in your module that you are using said directive.

import { DOCUMENT } from "@angular/common";
import { AfterViewInit, Directive, ElementRef, EventEmitter, Inject, OnDestroy, Output } from "@angular/core";
import { filter, fromEvent, Subscription } from "rxjs";

@Directive({
    selector: '[appClickOutside]',
})

export class ClickOutsideDirective implements AfterViewInit, OnDestroy {
    @Output() appClickOutside = new EventEmitter<void>();

    documentClickSubscription: Subscription | undefined;

    constructor(
        private element: ElementRef,
        @Inject(DOCUMENT) private document: Document,
    ) { }

    ngAfterViewInit(): void {
        // you are listening for a click anywhere on the document
        this.documentClickSubscription = fromEvent(this.document, 'click')
            .pipe(
                filter((event) => {
                    // the Rxjs filter will return when a click is not within the directive element
                    return !this.isInside(event.target as HTMLElement);
                }),
            )
            .subscribe(() => {
                // upon the case of element clicked outside the subscription will be emitted
                this.appClickOutside.emit();
            });
    }

    ngOnDestroy(): void {
        this.documentClickSubscription?.unsubscribe();
    }

    isInside(elementToCheck: HTMLElement): boolean {
        return (
            elementToCheck === this.element.nativeElement ||
            this.element.nativeElement.contains(elementToCheck)
        );
    }
}

How does this directive work?

The finer detail is that the subscription is being used to subscribe to specifically where the user is clicking on the document. The pipe contains a filter which checks if the user has clicked off the element or on the element, this is where we subscribe to said subscription to when the event has been clicked outside the element. The emitter will emit the appClickOutside emitter.

I don’t care how it works, what else must I do to get this setup in my project!

Assuring that you have created your directive and have declared it in your module next you will need to update the view. On the view of your component you will need to add the appClickOutside directive to the element that wraps around your custom dropdown menu, as you can see on line 2 I have a dropdown wrapper class to ensure that I have the area of the dropdown covered so you may need to specify the height or width depending on your layout.

If the click off is not quite working, I’d advice to take look at your styles and element wrapper.

Ya that is about it. Feel free to take a look at my working sample on github if you are facing any challenges
Working with component instances & @ng-bootstrap’s pop up modal

pop up modal

I’m gonna cut to the chase, so no story time here.

First off here is the documentation for the @ngbootrap Modal !

To install and setup first
run this command line to get access to the @ng-bootstrap/ng-bootstrap node modules.

npm i @ng-bootstrap/ng-bootstrap

Once you have installed the files make a new component for the Modal itself

You would need to import the NgbModal with the line below.


// import into modal.component.ts file
import { NgbModal } from '@ng-bootstrap/ng-bootstrap';

For this sample I am using the NgbModal. If you take a look at the documentation it has a list of APIs associated with the NgbModal and we are going to use some of the basic samples to get this up and running.

For the modal.component.html view what is nice is that you can use conditional rendering if you want to hide some of the details. or comment it out…I was having issues toggling and where to hide and show these details and I think this is the simplest way to manage with my specific demo project.

I have a working Angular 9 project that I have setup to emit a value of a userProfile component that contains the details of Name, Job and bio.

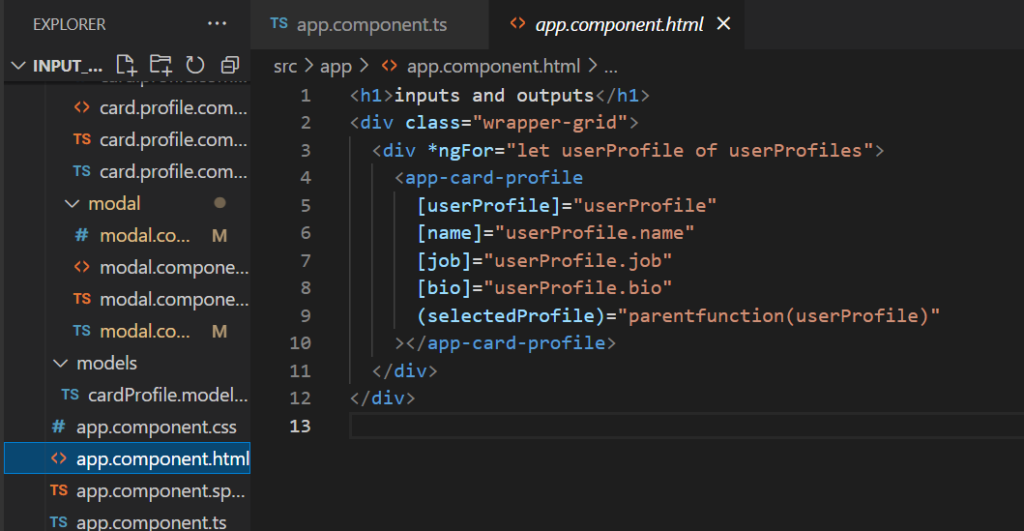
I was thinking of going through the code line by line but you’ll need to pass data to the component and through the emitter the function will emit the value to the parent component and now to create the component instance. So in the view you can see I’m using the event emitter value from the card profile component, so
this ‘(selectedProfile)= parentFunction(userProfile)” is going to help us create this component instance of the bootstrap modal in the main app component .

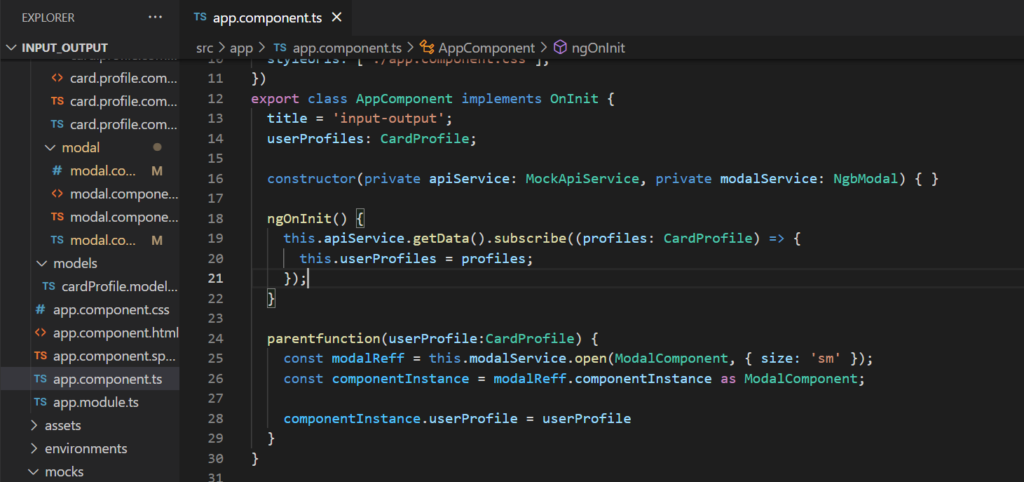
  parentfunction(userProfile:CardProfile) {
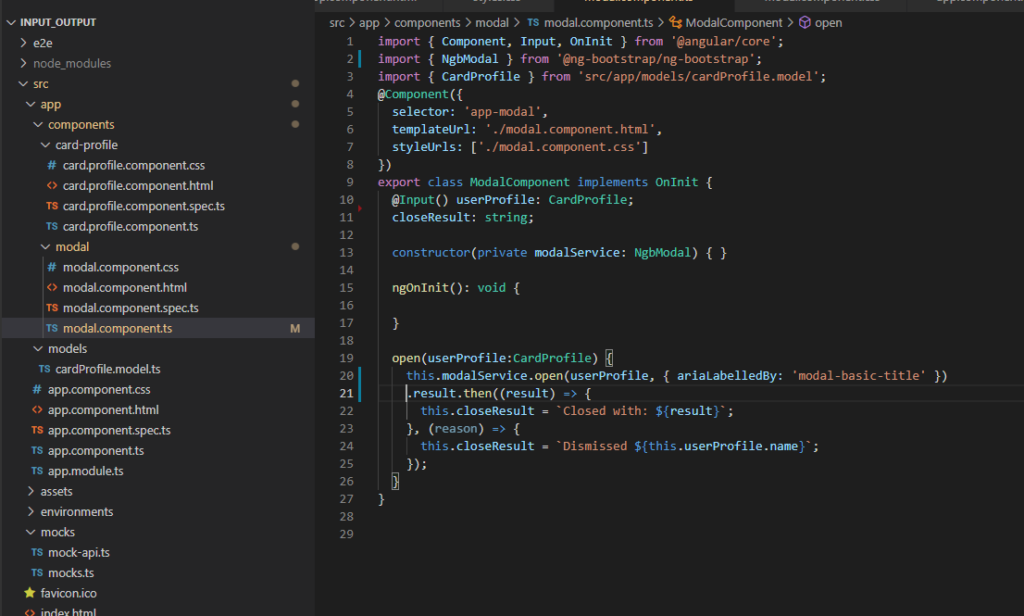
    const modalReff = this.modalService.open(ModalComponent, { size: 'sm' });
    const componentInstance = modalReff.componentInstance as ModalComponent;

    componentInstance.userProfile = userProfile
  }

The above is where the magic happens, upon clicking the parentFunction it’ll create a const modalReff. from there you can reference the componentInstance and should have access to the ModalComponent’s inputs and variables.

Granted its a bit of setup work but this is how one would use a component instance in a project

If you have any issues you can check out the working sample project right here

this carries examples of inputs and outputs

Angular how to make reuseable components with @Output Part 2

If you have read my first post covering @inputs then be sure to give that a quick read before continuing.

In the previous post we have covered all our inputs and you might be thinking what about @outputs, well lets make one. When you have an @output it would emit a value up to the parent component, I believe there are many ways to do this, but all I’m trying to say is that @output requires at least an emmitter. As seen in the card.profle component. (picture below).


Update the following code in the app.component.ts file:
  data = [
    {
      name: 'Jonny Doe',
      job: 'FrontEnd Gopher',
      bio: 'I am a Gopher that likes to FrontEnd Gophe',
    },
    {
      name: 'John Dear',
      job: 'Dear FrontEnd',
      bio: 'I am a Dear that likes to dearly FrontEnd',
    },
    {
      name: 'Tony Tones',
      job: 'FrontEnd Developer',
      bio: 'I am a Tony Tones,I use JavaScript, TypeScript and Angular Framework',
    },
  ];

  ngOnInit() {
    this.userProfiles = this.data;
  }

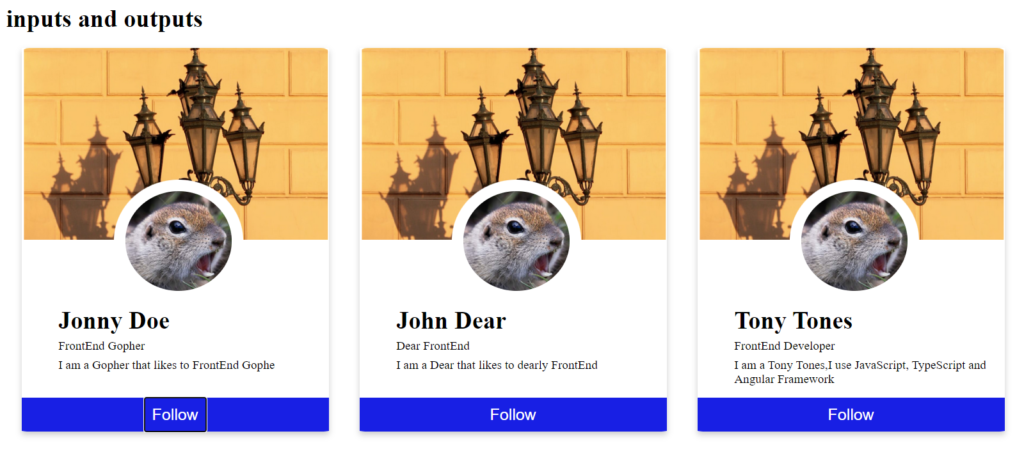
Refresh and you should have 3 loverly gophers staring at you.

In this example we will link the follow button to emit the username of the profile selected to the parent component. This exercise we will use the eventmitter to help us emit the profile name selected to the parent component.

Line 13 we have our @output named btnClick connected to our new eventEmitter of type string (for our name variable).

We use the buttonClicked() function and pass the variable name in the buttonClick(name), which we have declared in our cardprofile component and the next step is to link it on the app.component.html and you can see the emitter btnClick.

And finally to add the function in the app component

Now spin up the project and open the dev tools and click on one of the profiles.

Here we are console logging the profile username to the parent component and thats about it.


Feel free to fork my github, here is the source code.

Deploying angular cannot find js files?

Deploying Angular

Hey gents and ladies, as always there is a TLDR section for all of you. From time to time I need to deploy an angular project to my hosting site and just about everytime I try I come across the same issue.

I have a site hosted by Gator and I have access to the file manager where I can upload my Angular projects and what not.

Just about everytime I come across the following issue and at first it always baffels me.

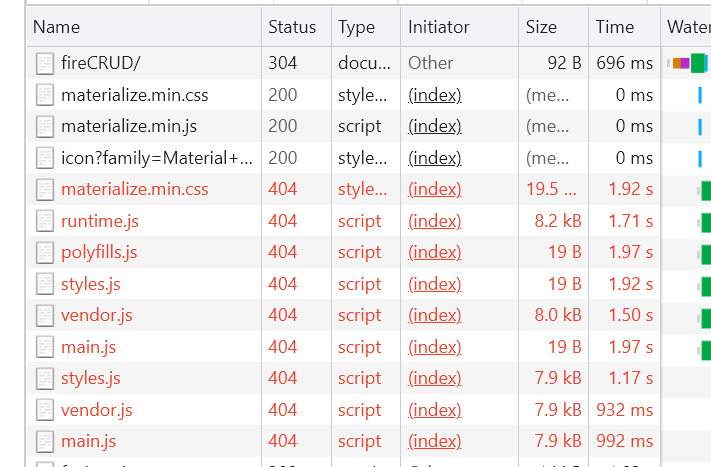
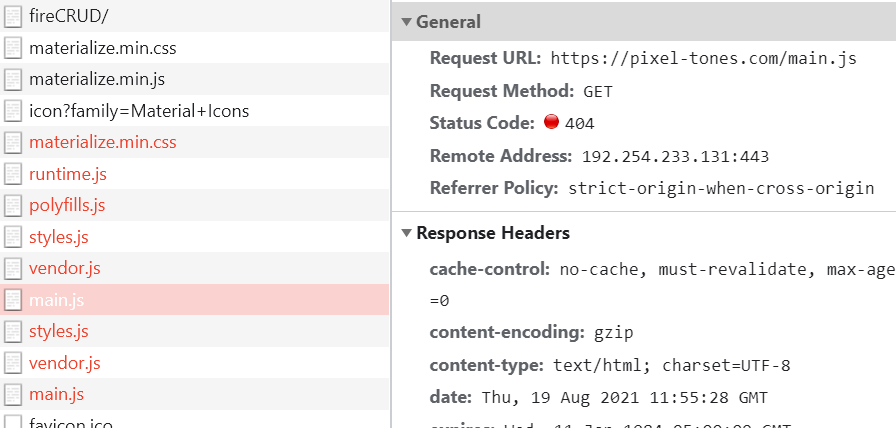
First is create a folder on my gator file manager and give it the name of my angular project and then do a ng build which creates a dist folder and then upload the dist folder contents (mainly js files) into the folder I created on the gator file manager ( that I pay a hefty price for) then this happens.

Then I think to myself, how does one fix this issue?
Upon closer inspection you will see that the file structure is not quite right. When selecting one of the failed js files have a look at the Request URL. It appears to have skipped my Angular project file name and tries to find the files at the base of my URL as seen below when highlighting main.js.

TLDR

I came across this Stackoverflow solution , which in the command terminal the command will set the baseUrl for the distribution file to find the proper location of said files. I forget the command line so this is a personal note for me.

ng build --base-href=/ANGULARPROJECTNAME/

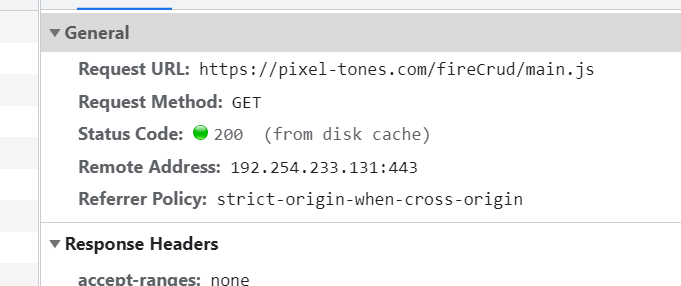
This will update the file structure and the results after deploying and uploading the appropriate files should look something this. Make sure your File naming convention is inline, I won’t lie this took me a few tries and yes my project is called fireCrud. I had to update my angular.json file to fix my naming convention.

Here is the stackOverflow solution that I referenced

Enjoy and happy deploying. Hope this helps

How to add material design icons on Angular 11

material icons

Hi guys as always i have a TLDR section so that people don’t have to deal with my sob story of the week. These are just my personal notes that I’ll go back to as to when I want to add material design icons to my project.

So, I have seen this before and of course there are a number of options as to how to install material design icons for your angular project, this is the solution that worked for me on my personal project.

TLDR
please note, if you have a project already built be sure to delete your node_modules in case of any problems.

// use this command in gitbash
npm install --save @angular/material && @angular/cdk && material-design-icons

This would be my first step the npm site has good documentation on how to set everything up but i’ll just continue on what i did next.

Add the following link in you index.html file

<link href="https://fonts.googleapis.com/icon?family=Material+Icons"
      rel="stylesheet">

Now you’ll need to do some imports to your app.module.component.ts file it should look something like this.

import { BrowserModule } from '@angular/platform-browser';
import { NgModule } from '@angular/core';

// Material stuff
import { MatIconModule } from '@angular/material/icon';
import { BrowserAnimationsModule } from '@angular/platform-browser/animations';

import { AppComponent } from './app.component';

@NgModule({
  declarations: [AppComponent],
  imports: [BrowserModule, BrowserAnimationsModule, MatIconModule],
  providers: [],
  bootstrap: [AppComponent],
})
export class AppModule {}

I just added a basic material icon examples here for the view app.component.html.

<div class="container">
    <h2>Material icon samples</h2>
    <span class="material-icons">face</span>
    <i class="material-icons">visibility</i>
    <mat-icon>home</mat-icon>
</div>

That should be it, I have a repo that has the material design’s icon on an Angular 11 project so it should be straight forward to compare. Have a great weekend!

POST EDIT
I came across an issue when following my step, if you have any compiling issue after setting up the icons run this command to install this version of material icons

npm i @angular/material@11.2.13

stackoverflow: solution here

How to add scss to your Angular project fast

scss new niece

Of course as always there is a TLDR thing somewhere down there.
I come across this from time to time and I normally forget all about it…then I just end up always using css (come on I can not be the only one)

Lets get to it, you have either built or going to build an angular project. In the past i have seen it ask and say “you wanna css, scs,s sasax and …” other options.
so i’d normally select scss and then it just worked.

TLDR COMMAND FOR ANGULAR PROJECT ALREADY BUILT
If you have already built an angular project then run the following line of code.

ng config schematics.@schematics/angular:component.style scss

This should add the style as scss in your angular.json package
for more in-depth detail you can read up on the source. on the one that has 557 votes oh wait 558.

ANOTHER THING TO NOTE
if you get the following error:
“Error Module not found: Error: Can’t resolve PATH in PATH or “didn’t return string.

Be sure to update your component’s style location cause it will still point to your component.css file


In the reference above, they also show you how to add scss to a new project by use of the following command:
TDLR COMMAND FOR NEW ANGULAR PROJECT

ng new NEWANGULARPROJECTNAME --style=scss 

Ok that’s it good luck
If this solution did not work for you, please feel free to comment. I know there never is a solution for everything.

Angular how to generate a new project in to a specific directory

bird and snow

When you are starting you just don’t know what you can do at times. I have been in a situation where I already have a file on where I want to put my new Angular project but sadly my folder structure gets messed up completely.

POST note: You will need to have installed the Angular CLI first before doing this step.

So use this command line below to create an Angular project and place said project into a specific directory of your choosing:

TLDR

ng new angular-project --directory=./new-angular-project-file

This should sort you out. In development its important to keep your work space clean especially your git repo. It doesn’t reflect well if your repo is being reviewed or checked out.

[Dev Notes] setup git credentials globally and quick

steamy gate

This happens from time to time when you are setting up a new machine or getting a new machine or a machine has just gone broke. Now you have to login with your credentials every time…no thank you!

So seeing that I have had to dig around a few times I decided to take my own notes to know where to go

How to check your current git credentials or if you have one

git config --list

Now you’ll either see a load of details or not too much happening in the console(if not much action be sure to install git to your machine first). However look for the user.name and user.email values. they should contain your git username and git email address.

How to set git credentials globally

$ git config --global user.name John_Doe
$ git config --global user.email johndoe@example.com

After adding your details you can check it out by following the first step to check if all has been set correctly.

There are more details for adding git credentials locally there may be an instance where you require another account to access another repo.

for more details here is my source

JavaScript What is hoisting?

adorable niece

Very important concept to understand, I’ll need to start with some context.

Context of Hoisting

We need to understand the life cycle of code and there are two main phases code goes through. The Creation Phase and the Execution Phase.

When does hoisting happen?

During the Creation Phase, the program will set all the global variables and if there are var variables declared they will be initialized with the value of ‘undefined’, upon the programs Execution Phase this will assign the value officially to the variable if the var is above the invoked function.

MDN definition:

The var statement declares a function-scoped or globally-scoped variable, optionally initializing it to a value.

My understanding of hoisting is:

The process of a variable(var, let, const) declaration a default value of undefined during the creation phase. Functions on the other hand upon starting up of the program are stored in memory source

https://youtube.com/watch?v=Nt-qa_LlUH0
Been through a few tuts and this guy explains it well enough for me to understand

The above tutorial also goes through other important concepts of JavaScript functions and their behavior when invoked.

firebase init command not found

boringimageyouarenotmissingout

TLDR below, as for now work has been more challenging and only now i’ve started working on some personal projects..well just project.

To become more familiar with firebase I went through this tutorial and it gets you up and connected. Also shows you the basic crud calls which is handy.

I started a new project and tried to follow the tutorial and I wanted to firebase init but the command was not found. Seeing that i’ll probably come across this again i have decided to make a lil dev note on this.

TLDR

Macbook:projectName tony$ firebase init
-bash: firebase: command not found
Macbook:projectName tony$ npm install -g firebase-tools

Install firebase tools globally by installing the following rpm package

npm install -g firebase-tools

There is also a chance that you are not signed into firebase yet. The terminal should prompt you to run “firebase login”.

firebase login

After successfully logging in you can run the following command

firebase init

Have a great day and good luck