Angular 13: How to make a clickoutside Directive with RXjs

Going outside with clickoutside directives

Hi all, it has certainly been a while, even though the only comments I get are from bizarre spam bots. As always there is a TLDR for you down below. So lets get into it.

Have you ever been in a situation where you make a lovely custom dropdown menu for someone and you do not know how to close the dropdown when you or they click away?

Well this is where a directive comes in and we even get to use fancy Rxjs in the mix.

Directives are defined as classes that can add new behavior to the elements in the template or modify existing behavior.

First off you will need to create your directive would recommend using the Angular CLI tool on this one.

// Angular generate new service
ng g s servicename

[Pro tip]: If you are unsure where the CLI tool will place your directive you can use the extension –dry-run.

We will be using RXjs in this directive to listen to the clicking of the element outside the assigned element

TLDR here is the Directive code to handle the clicking outside directive. Be sure to declare the Directive in your module that you are using said directive.

import { DOCUMENT } from "@angular/common";
import { AfterViewInit, Directive, ElementRef, EventEmitter, Inject, OnDestroy, Output } from "@angular/core";
import { filter, fromEvent, Subscription } from "rxjs";

@Directive({
    selector: '[appClickOutside]',
})

export class ClickOutsideDirective implements AfterViewInit, OnDestroy {
    @Output() appClickOutside = new EventEmitter<void>();

    documentClickSubscription: Subscription | undefined;

    constructor(
        private element: ElementRef,
        @Inject(DOCUMENT) private document: Document,
    ) { }

    ngAfterViewInit(): void {
        // you are listening for a click anywhere on the document
        this.documentClickSubscription = fromEvent(this.document, 'click')
            .pipe(
                filter((event) => {
                    // the Rxjs filter will return when a click is not within the directive element
                    return !this.isInside(event.target as HTMLElement);
                }),
            )
            .subscribe(() => {
                // upon the case of element clicked outside the subscription will be emitted
                this.appClickOutside.emit();
            });
    }

    ngOnDestroy(): void {
        this.documentClickSubscription?.unsubscribe();
    }

    isInside(elementToCheck: HTMLElement): boolean {
        return (
            elementToCheck === this.element.nativeElement ||
            this.element.nativeElement.contains(elementToCheck)
        );
    }
}

How does this directive work?

The finer detail is that the subscription is being used to subscribe to specifically where the user is clicking on the document. The pipe contains a filter which checks if the user has clicked off the element or on the element, this is where we subscribe to said subscription to when the event has been clicked outside the element. The emitter will emit the appClickOutside emitter.

I don’t care how it works, what else must I do to get this setup in my project!

Assuring that you have created your directive and have declared it in your module next you will need to update the view. On the view of your component you will need to add the appClickOutside directive to the element that wraps around your custom dropdown menu, as you can see on line 2 I have a dropdown wrapper class to ensure that I have the area of the dropdown covered so you may need to specify the height or width depending on your layout.

If the click off is not quite working, I’d advice to take look at your styles and element wrapper.

Ya that is about it. Feel free to take a look at my working sample on github if you are facing any challenges

BASIC MONGODB COMMANDS

basic bottles of mongoDB commands

Hi all, this is just my personal dev notes that I keep here so I can get a reminder from time to time. I’ve recently started to play around with Mongdb with great success using the MEAN stack approach, so I wont be going through the setting up but just some basic commands to get you going and started.

RUN COMMAND

mongo

CREATE A NEW TABLE COMMAND

use DBNAME

Once successful you will see the command line mention that you have “switched to db DBNAME”

SHOW DATABASE LIST COMMAND

show dbs

The terminal will list the available databases.

INSERT DOCUMENT INTO DATABASE

db.DBNAME.insert({
         firstName: "Tony", 
         lastName: "Marques",
         avatar: "01"
})

// result should show 
WriteResult({ "inserted" : 1 })

Hope this helps you quickly along. I am using MongoDB Compass Version 1.29.5 and node v14.18.0

How to add scss to your Angular project fast

scss new niece

Of course as always there is a TLDR thing somewhere down there.
I come across this from time to time and I normally forget all about it…then I just end up always using css (come on I can not be the only one)

Lets get to it, you have either built or going to build an angular project. In the past i have seen it ask and say “you wanna css, scs,s sasax and …” other options.
so i’d normally select scss and then it just worked.

TLDR COMMAND FOR ANGULAR PROJECT ALREADY BUILT
If you have already built an angular project then run the following line of code.

ng config schematics.@schematics/angular:component.style scss

This should add the style as scss in your angular.json package
for more in-depth detail you can read up on the source. on the one that has 557 votes oh wait 558.

ANOTHER THING TO NOTE
if you get the following error:
“Error Module not found: Error: Can’t resolve PATH in PATH or “didn’t return string.

Be sure to update your component’s style location cause it will still point to your component.css file


In the reference above, they also show you how to add scss to a new project by use of the following command:
TDLR COMMAND FOR NEW ANGULAR PROJECT

ng new NEWANGULARPROJECTNAME --style=scss 

Ok that’s it good luck
If this solution did not work for you, please feel free to comment. I know there never is a solution for everything.

[newbie]Dev notes: Basic checklist when starting a feature

As always there is a TLDR. Its been a while and yes everyday i’m still learning so much about myself and yadda yadda lets get on with it.

Thankfully i am blessed to work at a company where ‘Process is King’ (although this can be a good and bad thing…but that’s another story). As part of said process when it comes to stories/features we have a definition of “Ready”, this is a super important concept. This means that all questions have answers and you know as much as you can about the task/feature and there is no blockers or dependencies (i won’t go into detail but that could be anything from does the project actually run locally to do you need an API up for said feature to have you spoke to Big Phil yet?)

Each story/feature normally has its challenges and there are always unknowns and weird surprises…normally they just eat away at your time. These are the things you and the team will need to be concerned about and the developer that will carry this feature will need to make a decision if they are ready or not.

Now for the list , this is in no particular order.
*checklist listed here is credited to my current mentor fyi.

TLDR

  1. Do you have the requirements/BRS/documentation and have you read over the functional specs for the story?
  2. Are there any dependencies?
  3. Does the project I’m working on for this story run on my machine?
  4. Do you have a high level understanding of the story?
  5. Have you thought loosely about an implementation strategy?
  6. Do you have the designs necessary
  7. Is there a chance that you may have left the fridge open?

Overall there is always a lot of things to be aware of. The above list will help in most cases perhaps your project requires more particular checks before you can be “Ready to Dev”.

Of course if you feel that you do not understand the story or feel its too much for you or something on your checklist is not met, you must speak up to your Business Analyst or Project manager. This is super important to not set yourself up for failure.*

I am not saying that this list will take care of all the checks you need, but make a list that makes sense to you. This post is just expressing my opinion based on my experience so i’m happy to adjust my posts if they are not fair or correct….or if i have to add anything else
Have a great day.

Readers contributions

If you want to use the photo it would also be good to check with the artist beforehand in case it is subject to copyright.

Aaren Reggis Sela

[newbie] How to add flags on Angular Fast

I am assuming you have already built your angular app.
ok.
As always lets cut to it.

Html syntax required:

// Lists country flags
<div *ngFor="let country of countries">
      <ul>
        <li class="item">
          <a class="flag-icon flag-icon-{{ country.code }}"></a>
          {{ country.name }}
        </li>
      </ul>
    </div>
// Hardcode flag
<div>
 <a class="flag-icon flag-icon-za></a>
</div>

The above sample code will list some flags that have been populated by the countries array. Here is a countries array I made you can use to get started.

 countries: Country[] = [
    {
      name: "South Africa",
      code: "za",
    },
    {
      name: "France",
      code: "fr",
    },
    {
      name: "Switzerland",
      code: "ch",
    }
]

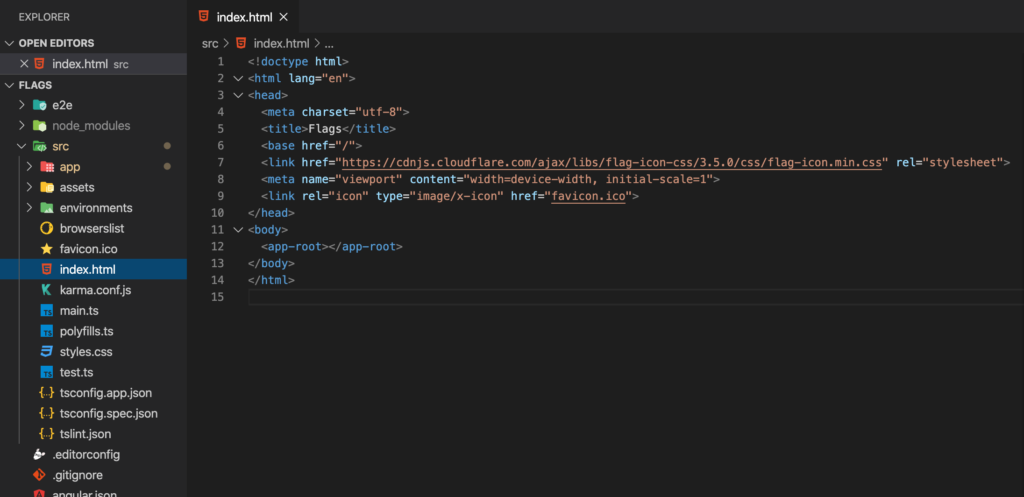
Add this line of code from CDN in your index file’s <header> tag.

https://cdnjs.cloudflare.com/ajax/libs/flag-icon-css/3.5.0/css/flag-icon.min.css
Should look something like this if you not sure.

You’re DONE!
If you are having any troubles you can take a look at
the repo goodbye , good luck and stay safe.

How to delete a branch locally

This is just a personal post on something ,I keep forgetting how to do.
So i am putting it where I know where to find it.

git branch -d <branch name>

For more information you can checkout the source

JavaScript Keypresses keyup keydown keypress

As Always I try to make my blog cater for peeps that are just looking for concise answers, so if you scroll down there is a TL DR section below. If you are curious of my thoughts then keep reading.

My knowledge of keypresses consisted of the brief summary of “you press a key and you can make something happen”. Turns out there is a bit more to it.

Keypresses have three different trigger points. I’m going to put my naive understanding of them first, then what MDN says cause that is the best source of truth out there in my opinion. I also used StackOverflow.

First you have keydown

My understanding of a Keydown is the action of when the button is pressed, so as the key is pressed down you can set an action or trigger something from that point.

Unlike the keypress event, the keydown event is fired for all keys, regardless of whether they produce a character value.

from MDN

To sum keydown: Keydown will trigger for all keys pressed(odd ones being ctrl, shift. delete..etc). If you press any key thats a keydown.

Second you have keyup

My understanding of a key up is the “release” action of the keydown action. So you can set an action upon lifting your key from a pressed state.

The keydown and keyup events provide a code indicating which key is pressed, while keypress indicates which character was entered. For example, a lowercase “a” will be reported as 65 by keydown and keyup, but as 97 by keypress. An uppercase “A” is reported as 65 by all events.

from MDN

To sum up keyup:. It trigger upon the release of a pressed key. Don’t worry MDN can be intimidating at times. It took me a while, but they are saying a keyup will trigger with a value of what key was pressed. Also, I think MDN has already moved on tooo..

Thirdly the keypress

My understanding: Keypress is the full action of just typing a key. so hit a key and let go and you have yourself a keypress buddy.

The keypress event is fired when a key that produces a character value is pressed down. Examples of keys that produce a character value are alphabetic, numeric, and punctuation keys. Examples of keys that don’t produce a character value are modifier keys such as Alt
, Shift
, Ctrl
, or Meta

From MDN

Ok, so my understanding of a keypress was a bit off. It appears to be including all chars that set a value and not other keys like shift, control, alt…etc that don’t produce a character. According to MDN it appears that the keypress is deprecated so you would just need to be aware of that when using keypress.

I never in my life thought that someone could complicate a key press, but here we are 2020 virus is out. Try to stay inside guys ok.

TL DR

The onKeyDown event is triggered when the user presses a key.
The onKeyUp event is triggered when the user releases a key.
The onKeyPress event is triggered when the user presses & releases a key (onKeyDown followed by onKeyUp).

from stackoverflow

In my defence I’m not as technical as MDN, my theory was around more towards what the stackoverflow post said.

I’ll leave you with that guys I really hope that this helps you out and helps you know that there is a bit more to a keypress than meets the eye.

On a side note. I got some positive comments on my previous post. Thanks so much for the support I’ll continue posting my findings and sharing the knowledge to help myself and others. I was so chuffed in fact i made a live sample of some javaScript and keypresses right here enjoy.

Generate new Angular project in specific directory

*solution I came across is at the bottom of the post. If you want to read about my experience then just keep on reading*.

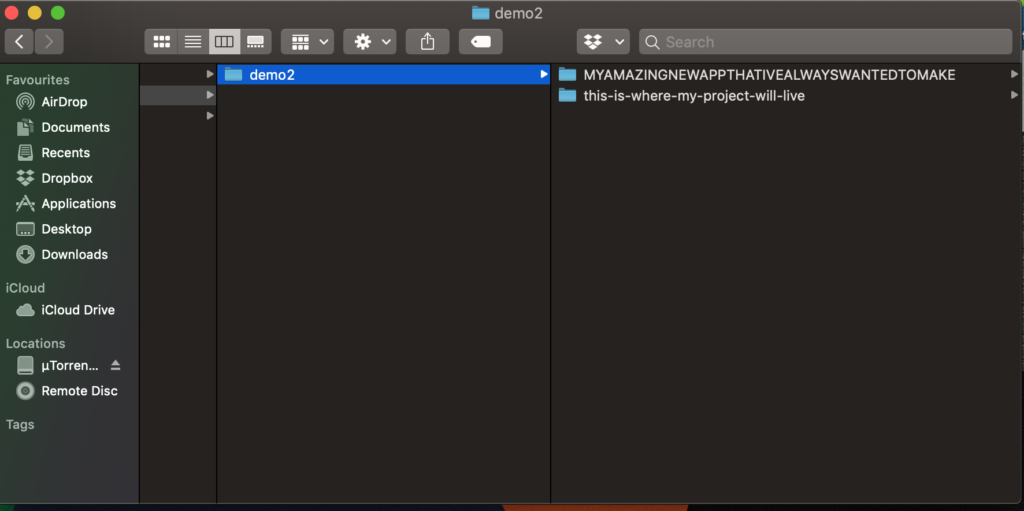
I normally come across this issue when i haven’t created a new angular project in a while. Making the directory of such project before building the project using the Angular CLI. So you have made a file called ‘this-is-where-my-project-will-live’. When you say

ng new MYAMAZINGNEWAPPTHATIVEALWAYSWANTEDTOMAKE 

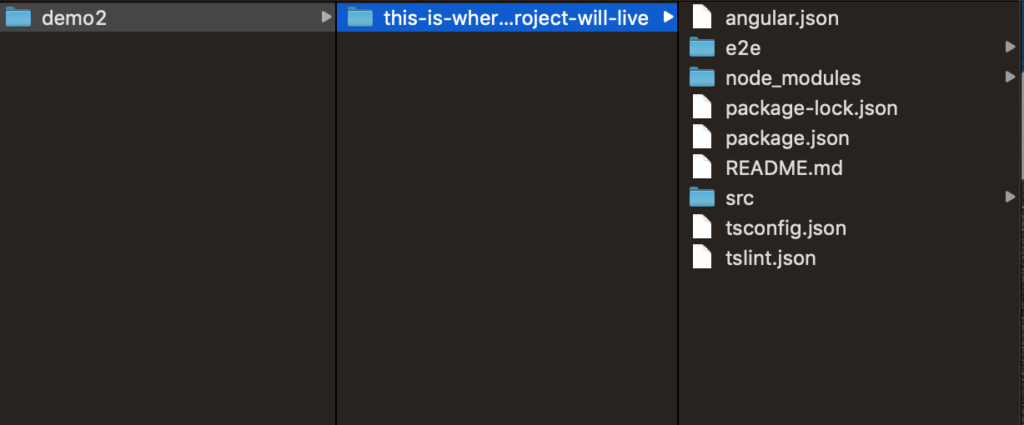
You will find that a new file has been generated and it’ll be looking something like this or you would need to drill down further into your file to get to the project itself.

So you think to yourself well, i might as well just cut and paste the entire project and….well forget that, here is an easier way.

To set where you want your project to be build use this little code snippet.

SOLUTION:

ng new MYAMAZINGNEWAPPTHATIVEALWAYSWANTEDTOMAKE --directory ./this-is-where-my-project-will-live

This will build your solution exactly into the specified directory, here is the sauce. The project will still have the same name, but will be located in folder that you have specified in the cmd.

hope that this helps you guys out

Angular: Unit Testing with Services and how to mock ’em

Ok, if you don’t know anything about Services this post is not for you JUST yet. Learn about em and come back here…if you wanna.

For those that made it past my first two lines and continued, we all know that services handle API calls and make real requests. Testing code that requires a service would normally need to receive or send data. You do not want to make real calls, you want to run this unit of code in isolation with no external dependencies. Unit tests normally run with CI (continuous Integration). It is just not feasible to make real API calls (with the chance of failing or taking long time for responses and potential failures). So the question that you want answered is, How to mock API service calls for unit tests?

I have recently come across this problem seeing that I am an official FrontEnd developer (this has happened basically 4 weeks ago still fresh) and one of my duties is to create unit tests for my work. I did some basic assertions which worked fine but there came a problem when it came to requiring a service to unit test my code.

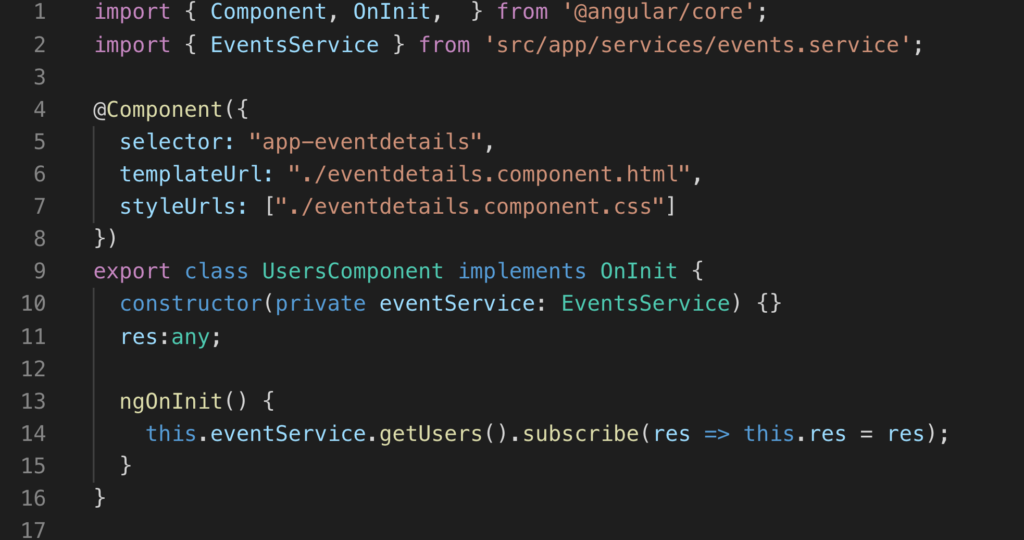
Let’s provide some context. You have a service called EventsService right, this guy has a method/call called getUsers. Simple. Now in the component that you are working with you need to import the EventsService to use that getUsers call for your unit tests as well as import the component you are unit testing.

So you use this guy(above) that makes the getUsers() method that is provided from the eventService upon the component’s ngOnInit() as seen in the image (still above).

With the code above this will make the request and return an observable which you can see we are subscribing to and initialising. So let us get to our spec component.

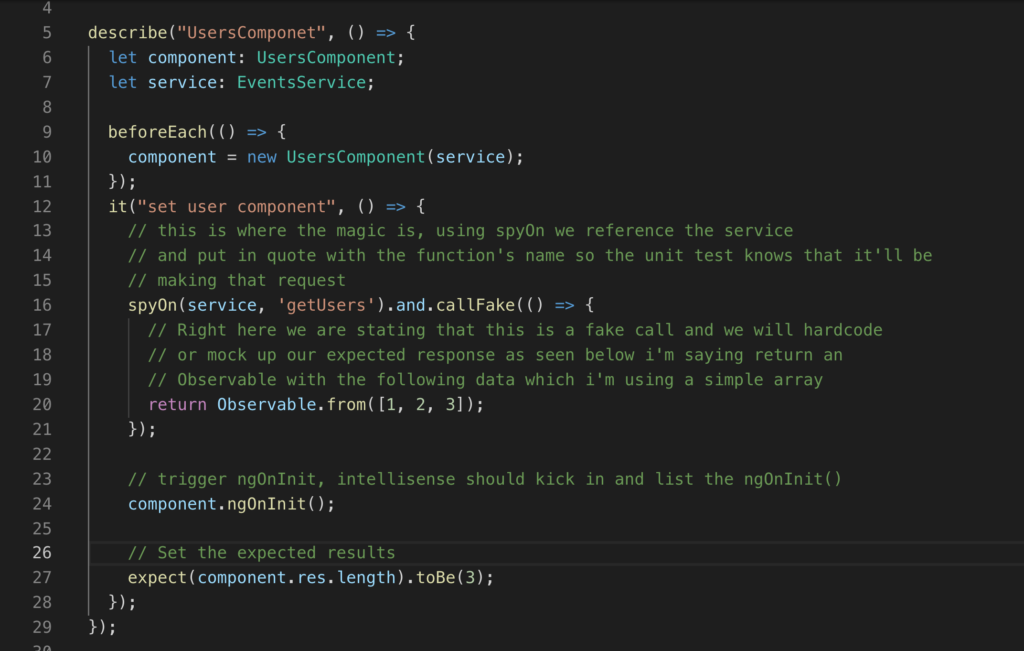
Added some comments for each step, sorry i know that there is a bit going on in this post. I tell ya explaining context is quite a challenge.

So you have declared and imported what services you need, and from there use spyOn to return an observable and set the data you wish to return, after that you would trigger the ngOnInit() from your component. There you have it, you have successfully faked an API call to return data that is to your liking and forming it at your will

Ideally the flow with unit testing is to use the 3 A rule

  • Arrange
  • Act
  • Assert

in the example i’ve been going on about, you can see that the first step was to arrange that service to provide mock data, the act would be to trigger the ngOnInit() from my users component and then Assert to see if the expect results are true.

Of course i am a newbie at this and i’ve i’m completely wrong please feel free to comment and point me in the right direction. Of course there are many way to peel a banana.

the Above examples is using Karma + Jasmine and Angular framework.

Angular Toast Notifications, quick! (for newbies)

Alright alright, it has been a long time. Now it’s time to take you through how to add a toast notification and fast.

The quickest and easiest way I could find was using this lil npm package from ngx-toastr is what you need for a quick and simple implementation.

Following the guide and going through the steps its pretty straight forward, but if you are having any troubles like i have…on that one time, i’m happy to share my findings.

Step one:

npm install ngx-toastr --save
// and if you already have it installed
npm install @angular/animations --save

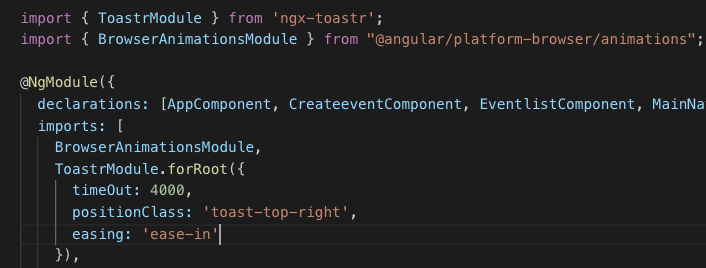
Cool so let that little console run. Once installed be sure to add the imports to your app module like so

Add them imports to your app.module.ts

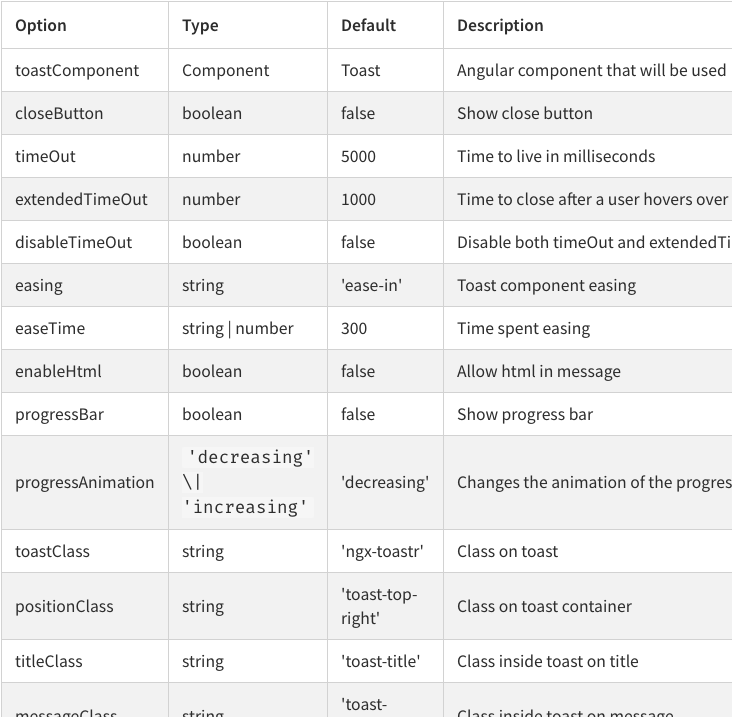
As you can see I have added something a little extra to the ToastrModule.forRoot({}), in those brackets you can do a number of tricks, adjust positioning animation and the works here are some details

and there are a number of options more

Now you need to add the stylings so the app knows how to make your toastie look good, check out your styles.css the main one ya’ll know what i’m talking about. You have a number of styling imports. This is where you need to be a tiny bit careful and note what style libraries you are using is it Bootstrap? Angular material? is it something else? Luckily we can do an import for whatever your style framework that you have implemented.

// regular style toast 
@import '~ngx-toastr/toastr';
 
// bootstrap style toast 
// or import a bootstrap 4 alert styled design (SASS ONLY) 
// should be after your bootstrap imports, it uses bs4 variables, mixins, functions 
@import '~ngx-toastr/toastr-bs4-alert';
 
// if you'd like to use it without importing all of bootstrap it requires 
@import '~bootstrap/scss/functions';
@import '~bootstrap/scss/variables';
@import '~bootstrap/scss/mixins';
@import '~ngx-toastr/toastr-bs4-alert';

So the problem i was facing was that i have implemented the toast notifications and all but they were not displaying. Turns out i was not using the correct toastr import styles. So lil lesson for me be sure to take note on what styling framework/libraries you are using. I used the regular toast implementation.

For my implementation of the toast notifications i wanted to add it as a service/shared component so it can be reused throughout the app..well “web-app” I am making, it looks a lil something like this (toast-message.service.ts).

import { Injectable } from '@angular/core';
import { ToastrService } from "ngx-toastr";

@Injectable({
  providedIn: 'root'
})
export class ToastMessageService {
  constructor(private toastr: ToastrService) { }
    showSuccess(text: string, title: string) {
        this.toastr.success(text, title);
    }
    showFail(text: string, title: string) {
      this.toastr.error(text, title);
  }
}

this way i’m able to inject this service into the constructor and utilise my toastie notifications for both success and error scenarios also having the freedom of adding my own text for the success/failure situation.


import { ToastMessageService } from "../../services/toast-message.service";
export class SomeCoolComponent implements OnInit {
  constructor(private toastr: ToastMessageService) {}

ngOnInit() {
this.toastr.showSuccess(
           // Body content of toastie
           "Has been successfully created.",
           // Header of toastie
            "A Toast notification"
          );
this.toastr.showError(
           // Body content of toastie
           "Has been successfully created an error.",
           // Header of toastie
            "A Toast notification for the masses and friends"
          );
}
}

I think that that about does it. This should be quick and simple, my project is running Angular 7. Lemme know if you come across any issues.