[Sample] Angular hitting API with Service

If you want the sample main steps scroll to the “TO THE POINT” part of this article thanks. If you all good keep reading.

So this lock out isolation thing has been quite challenging for everyone and I feel your pain. I was working on an angular portfolio…but its been mainly css when trying to cater for mobile view and tablet view…so I want to take a break from the css and get into interacting with an API

If you don’t know what an API is…this wont cover the fundamentals sadly, it’ll be a working example of an api request. As for now we are Focusing on Angular working with APIs using services.

There are many free open API sites the one i came across apifootball.com where upon registering they’ll provide you with an API key (you’ll need to keep this safe and secure) From my experience most of the free apis require a registration.

We have an api and an api key, now you want to check and see if we can make a call of some sort and log a response. A great API tool is postman. Basically setup the API call to your liking and it allows you to see and track the response and what not, look its great.

ok so that is the long of it. Now i’m going to try to keep it as short as possible. Yes that does say “overal_league_payed” learned that the hard way.

TO THE POINT HOW TO SETUP TO HIT AN API

Using the angular cli we can just enter the following command in the terminal

// short hand
ng g s serviceName
// full on
ng generate service serviceName

The command will generate a service for you in your solution. Basic boiler plate.

Right now you know your API is working. Let’s make that service in our angular app give that API a call and see if we can get their response.

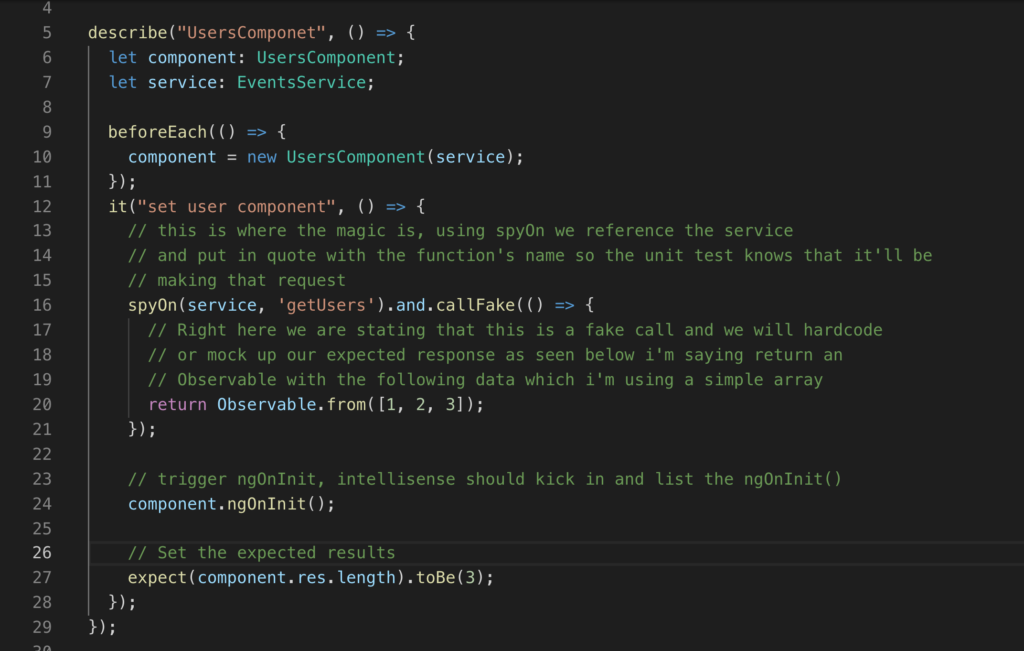
We need RXJS thats right that beast that does magic with Observables (high level comparison of observables vs promises.).
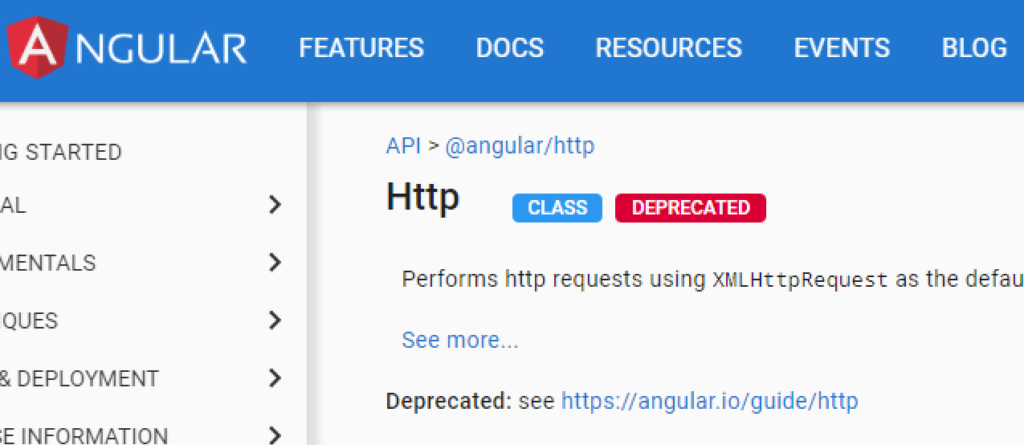
npm i rxjs

Make sure that you are using HttpClient for the http calls.
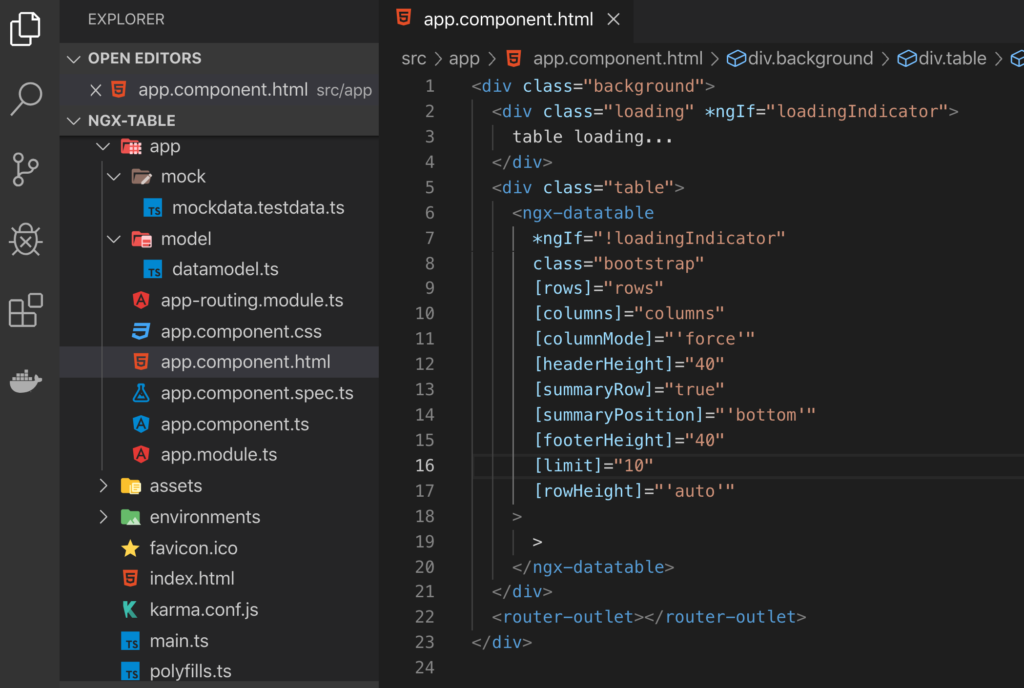
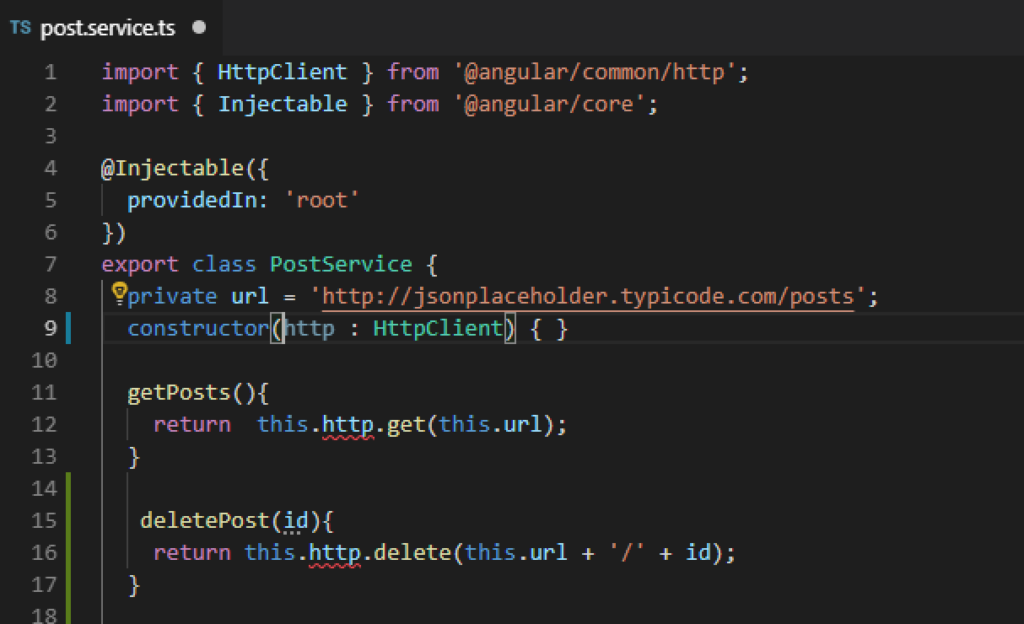
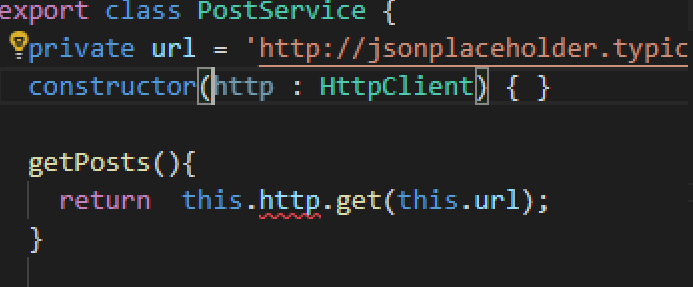
I normally use the below structure for api calls. Adding variable for base urls and other things that are constant like my apiKey this is just personal preference.

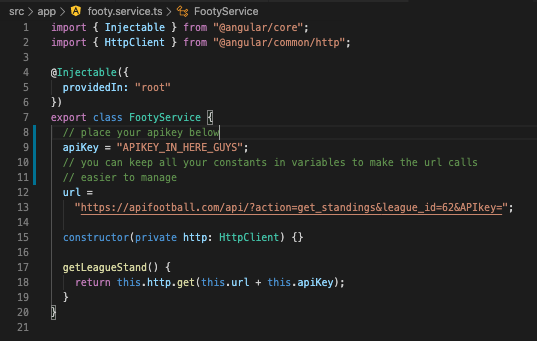
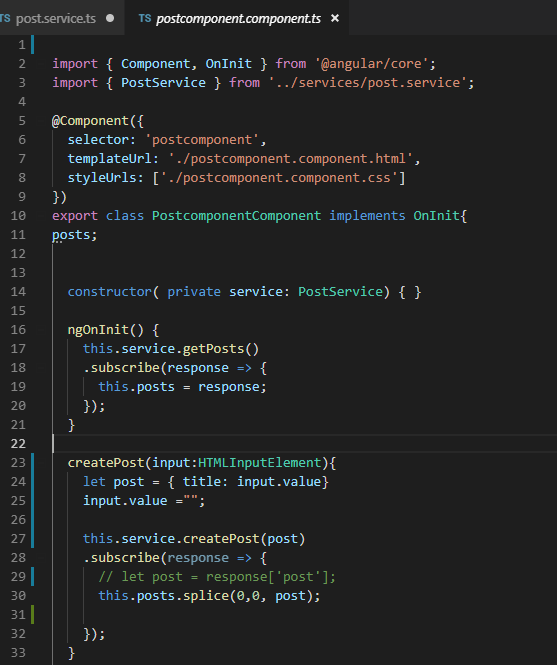
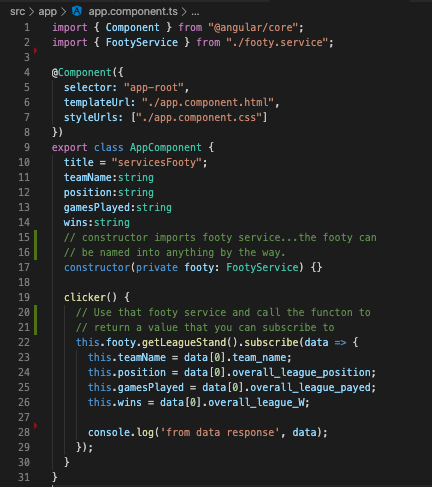
I was advised that when it comes to services, make sure they only deliver the data keep that part clean. Now moving along to the app.component we’ll need to create a function that hits that service and the getLeagueStand and subscribe to the response and then extract the data you want. Make sure you return the url.

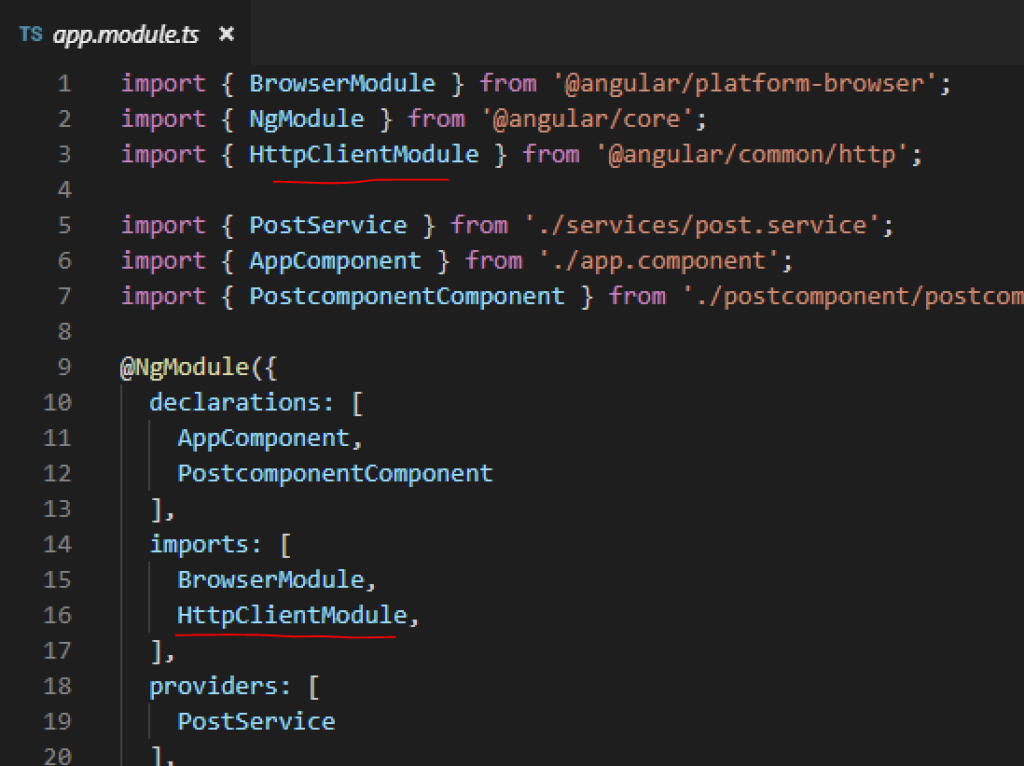
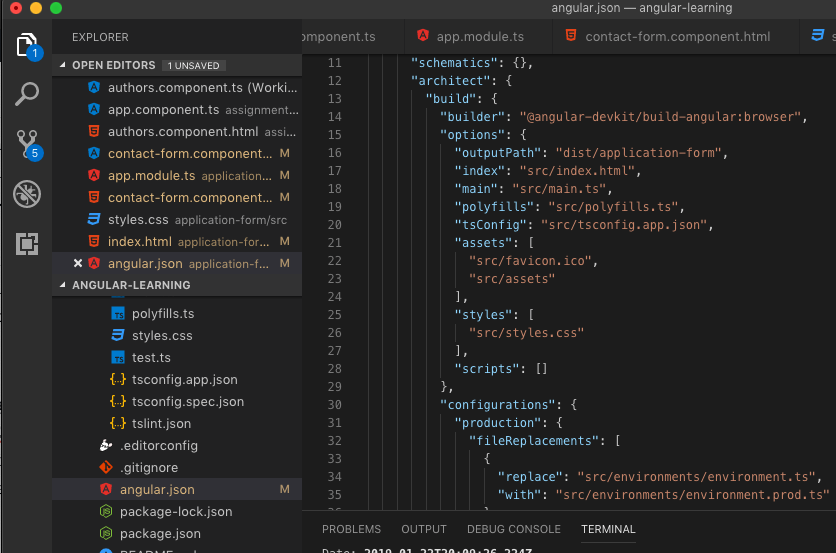
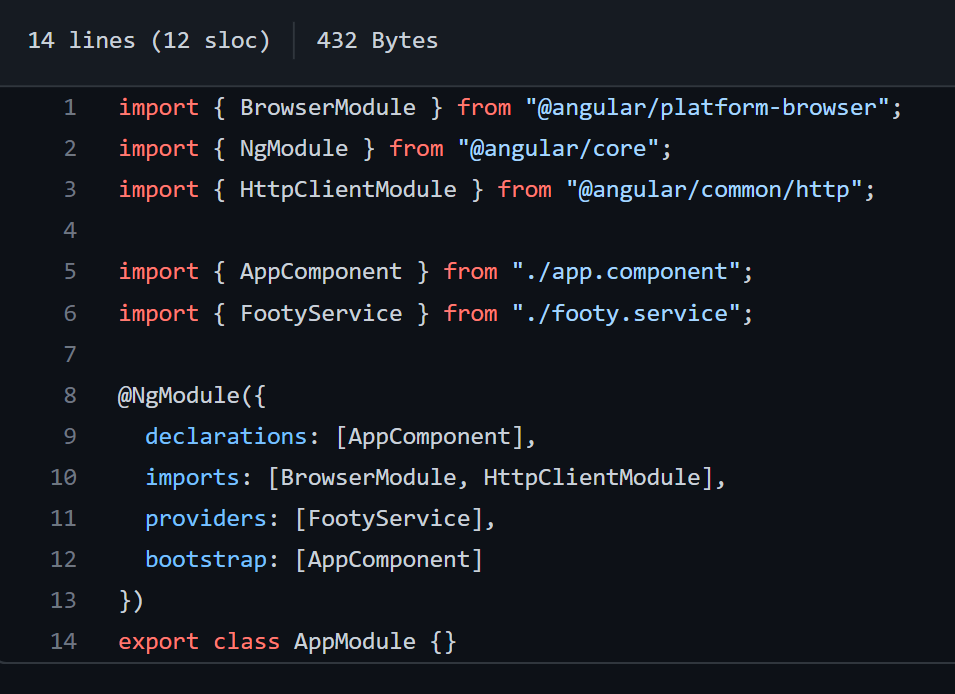
And ALSO do not forget to import your service and the httpClient module to your app.module file like so…I can’t believe I forgot to add this guy.


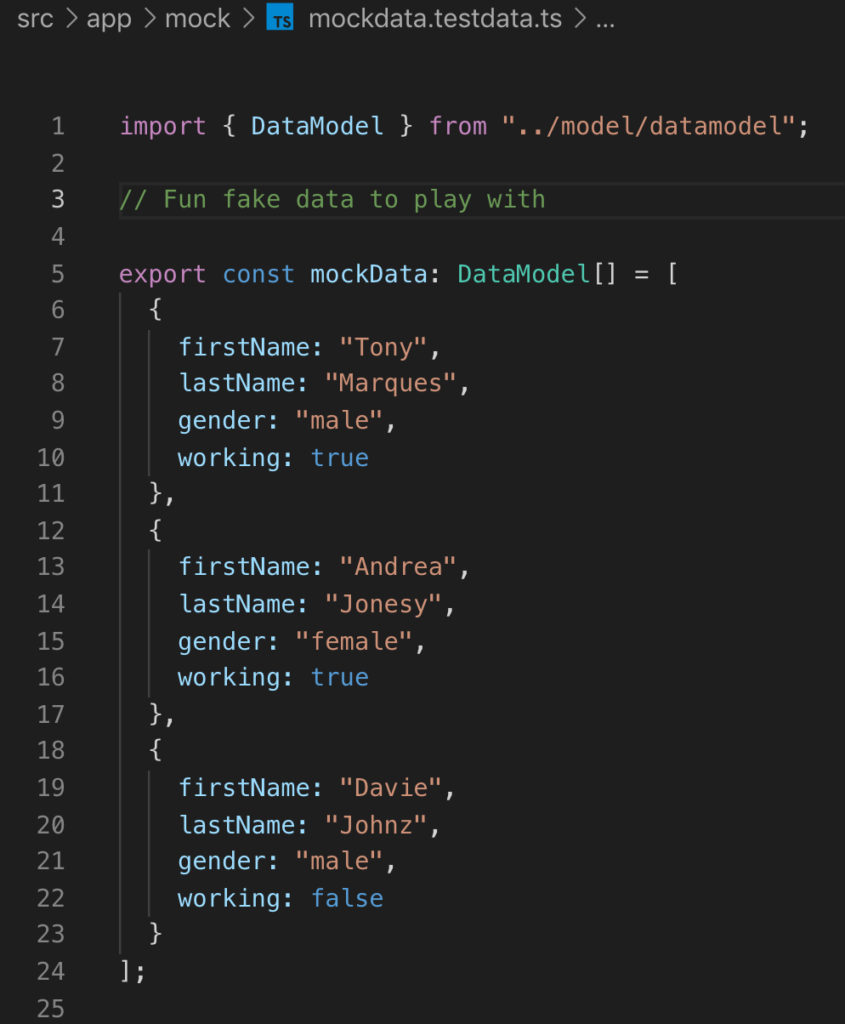
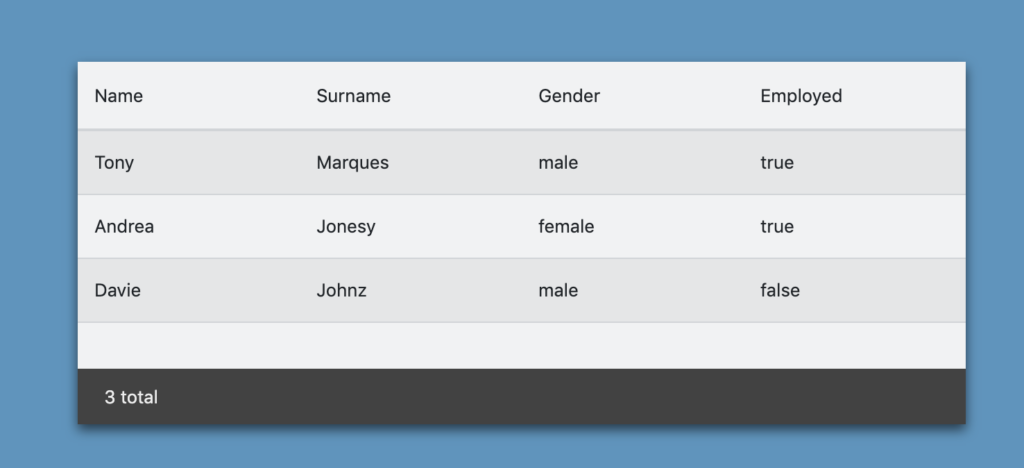
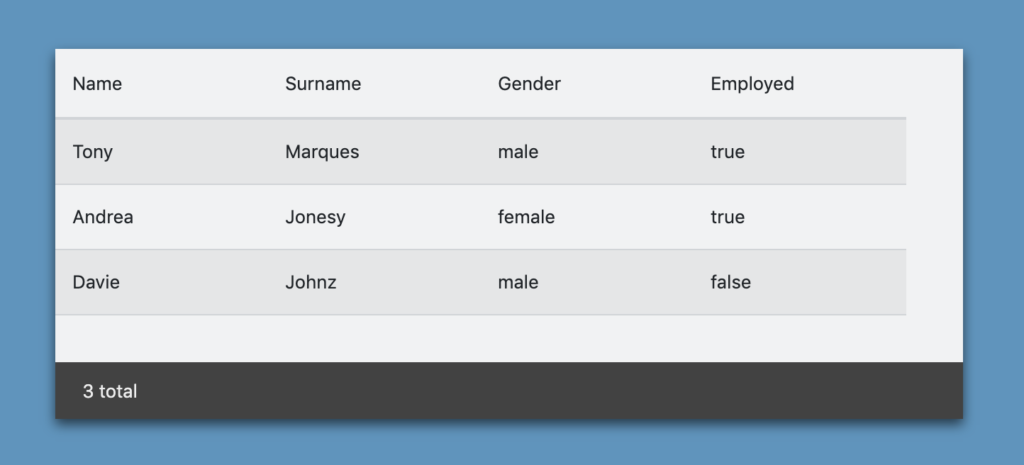
As you can see in the code above we subscribing to the data and then setting out its values to variables. Here is a repo to a working sample. You’ll need to add your own apikey though.

Understanding EventEmitters [for newbies]

I was trying to figure out how to use eventEmitters, be cause I forgot and I had no clue how to use them anymore. Then I came across this amazing video that shows you how its done.

this guy knows his stuff.

If you don’t want to watch the video or don’t have access to speakers, saving data… whatever, you can just follow along with me and my ways of explaining things to help me understand myself.

So I just want to explain it the best way i can understand it…so this won’t be textbook but it’ll probably just makes sense to me..ok enough disclaimers lets go.

Firstly you want to have an eventEmitter sample you can just go and clone this fella.

git clone https://github.com/tony2tones/eventEmitter-sample.git

There, now you have a project that has some eventEmitter action going down. It’s simple and it is a console log, but it’s the foundation to where we can start to understand whats happening.

Off the bat we can see that we will have a parent and child components to work with.

<app-component></app-component>
<header-component></header-component>

Let’s Navigate to the header component.

Now import Output, EventEmitter and a message to emit.

Maybe i’m going a bit slow, but it’ll pick up quickly i promise.

Now we can use those imports with making a new EventEmitter variable. This is very exciting and for the sake of speed you also added a function that emits the message…Oh also forgot an array of menu options.

Sweet, so we have made an emitterable variable called ‘messageBus’ which will “carry” the message string and emit it world wide.(within the boundaries of your angular project)

So we head on over to our Header view(html) and add the clickHandler function.

So thats officially in our header component…the parent component still doesn’t know anything about it just yet. There is one more step… ok there isn’t but we are close.

So how to we make it available? well you put it over here.

So we linkup that emitter variable called ‘messageBus’ to a function that can be found in our parent component.

Run that, check your console click on the nav and you’ll see the console responding with your emitted message all the way from the child component.

Generate new Angular project in specific directory

*solution I came across is at the bottom of the post. If you want to read about my experience then just keep on reading*.

I normally come across this issue when i haven’t created a new angular project in a while. Making the directory of such project before building the project using the Angular CLI. So you have made a file called ‘this-is-where-my-project-will-live’. When you say

ng new MYAMAZINGNEWAPPTHATIVEALWAYSWANTEDTOMAKE 

You will find that a new file has been generated and it’ll be looking something like this or you would need to drill down further into your file to get to the project itself.

So you think to yourself well, i might as well just cut and paste the entire project and….well forget that, here is an easier way.

To set where you want your project to be build use this little code snippet.

SOLUTION:

ng new MYAMAZINGNEWAPPTHATIVEALWAYSWANTEDTOMAKE --directory ./this-is-where-my-project-will-live

This will build your solution exactly into the specified directory, here is the sauce. The project will still have the same name, but will be located in folder that you have specified in the cmd.

hope that this helps you guys out

Ngx-datatables conditional rendering of columns

Hi, I trust that you have enjoyed the read on how to get setup with your ngx-datatables, if not checkout my previous post right here.

You have your ngx-datatable all set and you want to show a cool icon if there is a boolean value. Luckily we have such data in one of our columns.

note that the working data is a boolean

So when looking at the current solution and the HTML (or view as the pros like to call it) you would think that to add conditional rendering logic to a single column, one would need to add the following.

Well I was wrong. The code is correct but, this will not render the entire table as you can see below.

The point that I wanted to make is that you will need to add details now for every column, so if there are a 100 columns you would need to add 100 of them. I also did some conditional rendering with text. HOWEVER, please use boolean values, just wanted to show you that it is possible, but not recommended. Any text change or updates….cases will not make the conditions work.

the final code

You will need to add column details for every column if you want to use conditional rendering. The end result should look a little something like this.

very sexy I know.

So thats how one would do conditional rendering, using *ngIf logic using the row value boolean variable to dictate what to render.

I have added this to my github account under the ngx-datatable-conditional-rendering branch.

git clone https://github.com/tony2tones/ngx-table.git

How to setup ngx-datatables

Before I start, yes the image above has a table in it. I was hoping to fit everything into one blog post, but I think it may be best to breaking down into sections, so if its your first time using ngx tables this will hopefully help me and you on how to set it up more or less.

I was trying to find some sources on ngx-datatables and i only found a video podcast about people talking about how great it is from the creator with no real implementing advice. So I want to try to share my learnings from it

This video didn’t really explain how to use ngx-datatables.

I’ve got a repo on this so you can see how it works with working code, I won’t go through the setup of data (although I have added some comments…fun).

git clone https://github.com/tony2tones/ngx-table.git

Firstly setup your project and install the ngx-datatable goodies like so.

npm i @swimlane/ngx-datatable --save

One thing I’ve learned is don’t be so afraid of official documentation their docs which can be found here are actually pretty good so don’t be shy to give it a shot and their demos are great.

Side note for the peeps that want to use bootstrap styling on their ngx-dataatable be sure to check my post on adding bootstrap to a project quick and then add this guy to your projects root styles sheet.

// styles.css
@import "../node_modules/@swimlane/ngx-datatable/release/themes/bootstrap.css";

Ok , so your table comes with its basic stuff, a mock services with a data model to utilising the power of intellisense. If you open the master you’ll see in the app.component.html the following structure for the ngx-datatable.

the square bracket stuff.

ngx-datatables are pretty fancy and quite easy to custom. from adding a total count to adjusting column length and pagination. Feel free to edit these properties and find out what they are all about. For example the [columnMode]=”‘force'” just tries to let your column stretch across the dimensions so it doesn’t look weird…cause it looks weird without it.

without…gross i know

You will also encounter a columns array with prop and column name objects.

 public columns = [
    { prop: "firstName", name: "Name" },
    { prop: "lastName", name: "Surname" },
    { prop: "gender", name: "Gender" },
    { prop: "working", name: "Employed" }
  ];

The above code basically states the column names and props. I use the props for mapping the naming convention that i receive from the api (which i have mocked in my sample repo) so when the data comes in it knows where to go and with the name it is just the naming of the columns.

I’ve added an empty array called rows and as you can see in my ngOninIt() function i’m setting the data to the said rows array. then WHAM you have yourself a table showing lovely data. Next up will be conditional rendering… very excited to share it….and you can reduce the load time delay if you like. The loader credit goes to here.

Angular: Unit Testing with Services and how to mock ’em

Ok, if you don’t know anything about Services this post is not for you JUST yet. Learn about em and come back here…if you wanna.

For those that made it past my first two lines and continued, we all know that services handle API calls and make real requests. Testing code that requires a service would normally need to receive or send data. You do not want to make real calls, you want to run this unit of code in isolation with no external dependencies. Unit tests normally run with CI (continuous Integration). It is just not feasible to make real API calls (with the chance of failing or taking long time for responses and potential failures). So the question that you want answered is, How to mock API service calls for unit tests?

I have recently come across this problem seeing that I am an official FrontEnd developer (this has happened basically 4 weeks ago still fresh) and one of my duties is to create unit tests for my work. I did some basic assertions which worked fine but there came a problem when it came to requiring a service to unit test my code.

Let’s provide some context. You have a service called EventsService right, this guy has a method/call called getUsers. Simple. Now in the component that you are working with you need to import the EventsService to use that getUsers call for your unit tests as well as import the component you are unit testing.

So you use this guy(above) that makes the getUsers() method that is provided from the eventService upon the component’s ngOnInit() as seen in the image (still above).

With the code above this will make the request and return an observable which you can see we are subscribing to and initialising. So let us get to our spec component.

Added some comments for each step, sorry i know that there is a bit going on in this post. I tell ya explaining context is quite a challenge.

So you have declared and imported what services you need, and from there use spyOn to return an observable and set the data you wish to return, after that you would trigger the ngOnInit() from your component. There you have it, you have successfully faked an API call to return data that is to your liking and forming it at your will

Ideally the flow with unit testing is to use the 3 A rule

  • Arrange
  • Act
  • Assert

in the example i’ve been going on about, you can see that the first step was to arrange that service to provide mock data, the act would be to trigger the ngOnInit() from my users component and then Assert to see if the expect results are true.

Of course i am a newbie at this and i’ve i’m completely wrong please feel free to comment and point me in the right direction. Of course there are many way to peel a banana.

the Above examples is using Karma + Jasmine and Angular framework.

Angular Http deprecated??!!

I know that this post is a little click batey, but I was in a total shock when I heard the news and you won’t believe what happened next.

Angular developers are outraged, I think

You may be asking when did this happen ( 20 Aug 2017 apparently) and what am i supposed to do now, I’ve got this tutorial that I’m following but this geyser is using Http!

Don’t stress, Angular is now using an improved method to handle HTTP requests using HttpClient. I’m going to go over some basics.

Firstly you will need to add HttpClient to your app.model.ts file in the imports section. You may be asking do I have to, my reply is if you want this to work yes.

Cool, so with that done we have access to all the HttpClientModule’s tricks.
I have created a service component to show off my http skills, be sure to import the httpClient as …HttpClient on top of your typeScript file like so.

So you’ve happily imported your HttpClient, and created your constructor with (http: HttpClient). Now you’re seeing a compile error and thinking…

what is dees?!

If you add a “private” in the constructor you will see that the http will be available throughout that specific ts file and the compile error will magically disappear , so do not stress.

You may not have tried using a service components, this is just to clean up your code and put it into good reading order. Best practice for api calls to be located into these service component files. As you can see in the screenshot below that i reference the service call to get access to the api calls for my application.

i.e. be sure to not share end points to the public, but this end point is for practice and funzies so knock yourself out with jsonplaceholder.typicode.com

For more information about httpClient be sure to checkout Angular docs.

Adding bootstrap to a new Angular Project

Such a long time since i’ve made a post I know I know.

So my learning on React has slowed down a bit. This is due to the fact that I have to get to my head wrapped around Angular now. Exciting times as always shifting and changing.

I’ve been coming across a problemo when starting a new project there is no bootstrap and I’ll be honest here, i keep forgetting how to add it. So here is a lil step by step on how to add Bootstrap stylings to your new Angular project.

I am assuming that you have already done the whole

ng new CREATESOMENEWANGULARAPPTH....

This is not quite the name of the project i made, but still lets continue on how to fast track some bootstrap styles shall we.

first you need to install it as a dependency via your console with npm, just pot this little sucker in.

npm install ngx-bootstrap bootstrap --save

Just watch that puppy install itself and now we get on to the next step. So if you have a look into your angular.json file you’ll see that it does reference some stylings to your styles.css file that is auto generated when making the project as seen in the image below:

This is a good start, now all ya gotta do is add an import in that “styles.css” file here pot this in

/* add this to your styles.css file found in your project src
@import "~bootstrap/dist/css/bootstrap.css";

Now stop the console and redo the whole “ng serve” move and that should sort you right out. Hope this helps you cause now i don’t need to re-remember how i pulled this off.

happy bootstrapping with your angulars

POST EDIT:
If you want the modules for the @ng-bootstrap/ng-bootstrap, use the following command to install this package, Loads of functionality that is bootstrap related

npm i @ng-bootstrap/ng-bootstrap