When you are starting you just don’t know what you can do at times. I have been in a situation where I already have a file on where I want to put my new Angular project but sadly my folder structure gets messed up completely.
POST note: You will need to have installed the Angular CLI first before doing this step.
So use this command line below to create an Angular project and place said project into a specific directory of your choosing:
TLDR
ng new angular-project --directory=./new-angular-project-file
This should sort you out. In development its important to keep your work space clean especially your git repo. It doesn’t reflect well if your repo is being reviewed or checked out.
Very important concept to understand, I’ll need to start with some context.
Context of Hoisting
We need to understand the life cycle of code and there are two main phases code goes through. The Creation Phase and the Execution Phase.
When does hoisting happen?
During the Creation Phase, the program will set all the global variables and if there are var variables declared they will be initialized with the value of ‘undefined’, upon the programs Execution Phase this will assign the value officially to the variable if the var is above the invoked function.
MDN definition:
The var statement declares a function-scoped or globally-scoped variable, optionally initializing it to a value.
My understanding of hoisting is:
The process of a variable(var, let, const) declaration a default value of undefined during the creation phase. Functions on the other hand upon starting up of the program are stored in memory source
https://youtube.com/watch?v=Nt-qa_LlUH0
Been through a few tuts and this guy explains it well enough for me to understand
The above tutorial also goes through other important concepts of JavaScript functions and their behavior when invoked.
Merry Xmas and there isn’t a TLDR on this post but there is an angular 10 git project repo below! stay safe wear a mask properly and take care of yourselves.
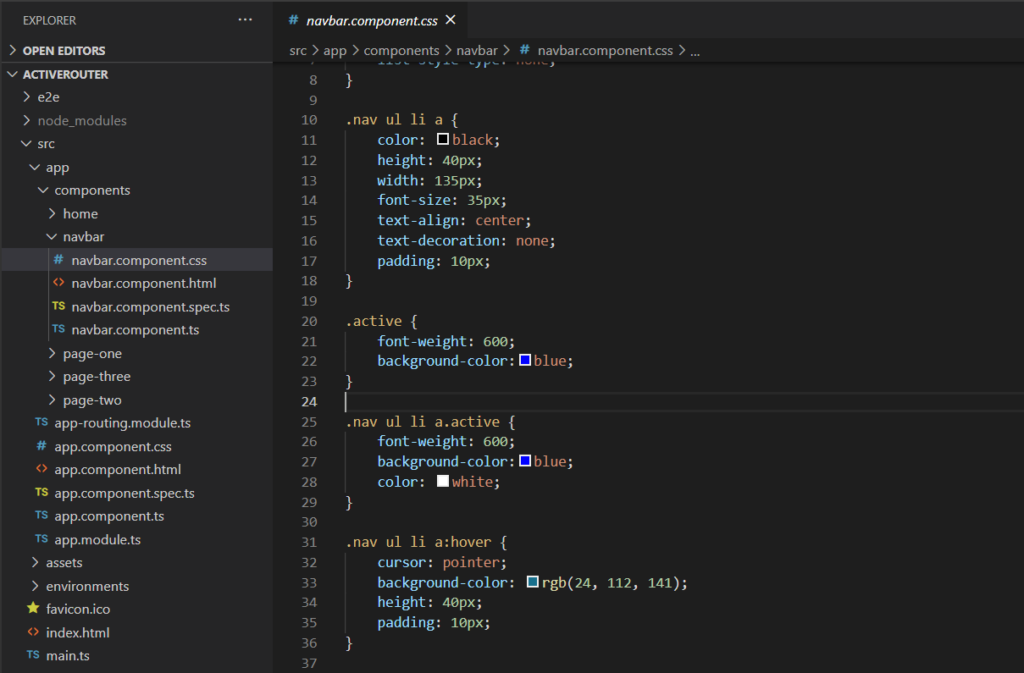
I assure you that this is easier than you think it is. Firstly you’ll need to add the active rout class to your css or scss,
I’ll be honest I went a bit overboard with the styles but ya its for demonstrative purposes I swear
Side Note I would love some feedback on if my image snippets are helpful or readable. You want to place some code in your style sheets for the active state style.
.nav ul li a.active {
    font-weight: 600;
    background-color:blue;
    color: white;
}

// or just simply
.active {
     font-weight: 600;
     color: white;
}
You want to import this active router functionality into this project so go to your project modules. This snippet is in the context of my project by the way so just note the RouterModule.
import { BrowserModule } from '@angular/platform-browser';
import { NgModule } from '@angular/core';

import { AppRoutingModule } from './app-routing.module';
import { AppComponent } from './app.component';
import { HomeComponent } from './components/home/home.component';
import { PageOneComponent } from './components/page-one/page-one.component';
import { PageTwoComponent } from './components/page-two/page-two.component';
import { PageThreeComponent } from './components/page-three/page-three.component';
import { RouterModule, Routes } from '@angular/router';
import { NavbarComponent } from './components/navbar/navbar.component';

const routes: Routes = [
  { path: 'home', component: HomeComponent },
  { path: 'page-one', component: PageOneComponent },
  { path: 'page-two', component: PageTwoComponent },
  { path: 'page-three', component: PageThreeComponent },
  { path: '**', component: HomeComponent }

]; // sets up routes constant where you define your routes


@NgModule({
  declarations: [
    AppComponent,
    HomeComponent,
    PageOneComponent,
    PageTwoComponent,
    PageThreeComponent,
    NavbarComponent
  ],
  imports: [
    BrowserModule,
    AppRoutingModule,
    RouterModule.forRoot(routes)
  ],
  exports: [RouterModule],
  providers: [],
  bootstrap: [AppComponent]
})
export class AppModule { }
Note the export and imports above, be sure to place it in the correct style sheet. From there active your navigation styles tags like so.
Npm install and make sure nothing is missing and you should be well on your way with the active styles triggering per active link match. For a working example checkout my github project.
For a deeper implementation referencing parents and ancestors please be sure to take a look at the following post.
TLDR below, as for now work has been more challenging and only now i’ve started working on some personal projects..well just project.
To become more familiar with firebase I went through this tutorial and it gets you up and connected. Also shows you the basic crud calls which is handy.
I started a new project and tried to follow the tutorial and I wanted to firebase init but the command was not found. Seeing that i’ll probably come across this again i have decided to make a lil dev note on this.
TLDR
Macbook:projectName tony$ firebase init
 -bash: firebase: command not found
Macbook:projectName tony$ npm install -g firebase-tools
Install firebase tools globally by installing the following rpm package
npm install -g firebase-tools
There is also a chance that you are not signed into firebase yet. The terminal should prompt you to run “firebase login”.
firebase login
After successfully logging in you can run the following command
This happens to me from time to time. When you are trying to merge with some local branch and there are some conflicts you want to fix on the fly then this terminal asks you to add a comment so you do and you don’t know how to exit….
Terrifying stuff I know so here is how you close that VIM terminal. After adding your comment and looking lost enter this below:
:wp
For definitions and more detail check out this source