Angular 13: How to make a clickoutside Directive with RXjs

Going outside with clickoutside directives

Hi all, it has certainly been a while, even though the only comments I get are from bizarre spam bots. As always there is a TLDR for you down below. So lets get into it.

Have you ever been in a situation where you make a lovely custom dropdown menu for someone and you do not know how to close the dropdown when you or they click away?

Well this is where a directive comes in and we even get to use fancy Rxjs in the mix.

Directives are defined as classes that can add new behavior to the elements in the template or modify existing behavior.

First off you will need to create your directive would recommend using the Angular CLI tool on this one.

// Angular generate new service
ng g s servicename

[Pro tip]: If you are unsure where the CLI tool will place your directive you can use the extension –dry-run.

We will be using RXjs in this directive to listen to the clicking of the element outside the assigned element

TLDR here is the Directive code to handle the clicking outside directive. Be sure to declare the Directive in your module that you are using said directive.

import { DOCUMENT } from "@angular/common";
import { AfterViewInit, Directive, ElementRef, EventEmitter, Inject, OnDestroy, Output } from "@angular/core";
import { filter, fromEvent, Subscription } from "rxjs";

@Directive({
    selector: '[appClickOutside]',
})

export class ClickOutsideDirective implements AfterViewInit, OnDestroy {
    @Output() appClickOutside = new EventEmitter<void>();

    documentClickSubscription: Subscription | undefined;

    constructor(
        private element: ElementRef,
        @Inject(DOCUMENT) private document: Document,
    ) { }

    ngAfterViewInit(): void {
        // you are listening for a click anywhere on the document
        this.documentClickSubscription = fromEvent(this.document, 'click')
            .pipe(
                filter((event) => {
                    // the Rxjs filter will return when a click is not within the directive element
                    return !this.isInside(event.target as HTMLElement);
                }),
            )
            .subscribe(() => {
                // upon the case of element clicked outside the subscription will be emitted
                this.appClickOutside.emit();
            });
    }

    ngOnDestroy(): void {
        this.documentClickSubscription?.unsubscribe();
    }

    isInside(elementToCheck: HTMLElement): boolean {
        return (
            elementToCheck === this.element.nativeElement ||
            this.element.nativeElement.contains(elementToCheck)
        );
    }
}

How does this directive work?

The finer detail is that the subscription is being used to subscribe to specifically where the user is clicking on the document. The pipe contains a filter which checks if the user has clicked off the element or on the element, this is where we subscribe to said subscription to when the event has been clicked outside the element. The emitter will emit the appClickOutside emitter.

I don’t care how it works, what else must I do to get this setup in my project!

Assuring that you have created your directive and have declared it in your module next you will need to update the view. On the view of your component you will need to add the appClickOutside directive to the element that wraps around your custom dropdown menu, as you can see on line 2 I have a dropdown wrapper class to ensure that I have the area of the dropdown covered so you may need to specify the height or width depending on your layout.

If the click off is not quite working, I’d advice to take look at your styles and element wrapper.

Ya that is about it. Feel free to take a look at my working sample on github if you are facing any challenges

How to setup JEST with ANGULAR incl working sample

unit testing

I wanted to make a whole story on this, but i’d rather try make this document as helpful and to the point as possible, hope this helps you setup jest in your Angular project.


import jest setup that is found in the jest-preset-angular.
This will be in your test.ts file

// add to test.ts file
import 'jest-preset-angular/setup-jest';

Add the following jest packages the the package.json

 // package.json file
 
 // update your test script to
    "test": "jest",
 
 // Packages to add to devDependencies
    "jest": "^27.3.1",
    "jest-preset-angular": "^10.0.1"

After adding the jest packages be sure to run npm install, you can also remove the karma packages to keep things tidy.
In the project’s tsconfig.json add the following to your compilerOptions object:

// add the following in your tsconfig.json
...,
  "angularCompilerOptions": {
    "fullTemplateTypeCheck": true,
    "strictInjectionParameters": true
  }

Run the following command, this will help transcript jest to typescript seeing that jest is JavaScript and will need to work with type script.

npm i ts-jest

Create a jest.config.js file in the base of your project ‘src/jest.config.js’

const { pathsToModuleNameMapper } = require('ts-jest');
const { compilerOptions } = require('./tsconfig.json');

module.exports = {
    preset: "jest-preset-angular",
    setupFilesAfterEnv: ["<rootDir>/src/test.ts"],
    testMatch: ["**/+(*.)+(spec).+(ts)"],
    moduleNameMapper: pathsToModuleNameMapper(compilerOptions.paths || {}, {prefix: "<rootDir>/"})
}

I think that that should sort you out. With regards to the different versions of Angular and Jest, and its angular preset packages, they seem to be inline with the angular version number, like my project is angular 11 and I have another using 12 and the preset 10 and up seems to cover it. I also have used it on an Angular 9 project and the jest-preset-angular version was 9.0.4

EXTRA SETUP NOTE FOR JEST
I had to added the Jest to the types in the tsconfig.spec.json, so that my unit test files have access to jest.

Sample project with Jest setup already:
sample-project

Working with component instances & @ng-bootstrap’s pop up modal

pop up modal

I’m gonna cut to the chase, so no story time here.

First off here is the documentation for the @ngbootrap Modal !

To install and setup first
run this command line to get access to the @ng-bootstrap/ng-bootstrap node modules.

npm i @ng-bootstrap/ng-bootstrap

Once you have installed the files make a new component for the Modal itself

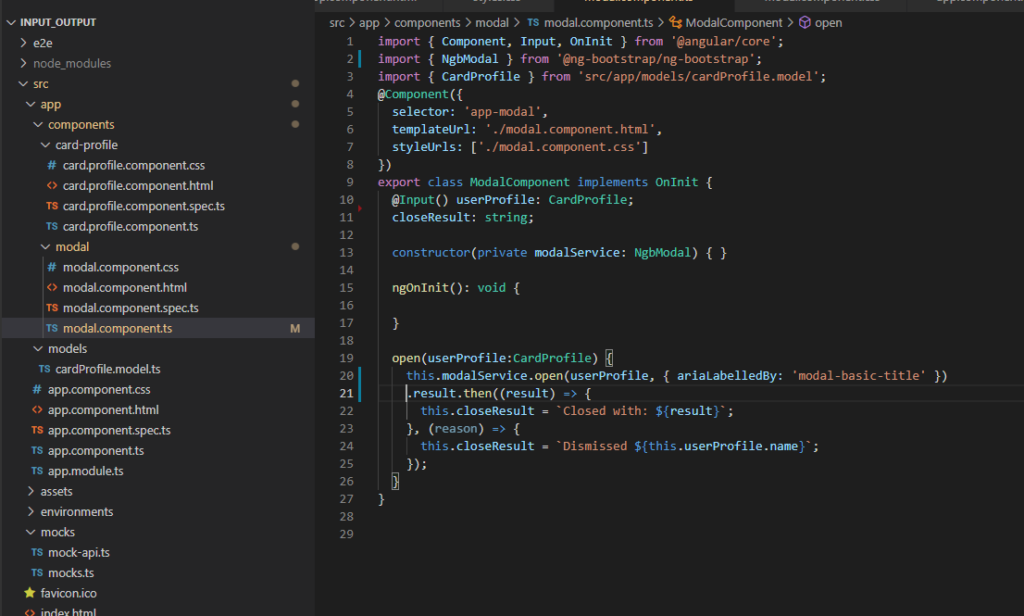
You would need to import the NgbModal with the line below.


// import into modal.component.ts file
import { NgbModal } from '@ng-bootstrap/ng-bootstrap';

For this sample I am using the NgbModal. If you take a look at the documentation it has a list of APIs associated with the NgbModal and we are going to use some of the basic samples to get this up and running.

For the modal.component.html view what is nice is that you can use conditional rendering if you want to hide some of the details. or comment it out…I was having issues toggling and where to hide and show these details and I think this is the simplest way to manage with my specific demo project.

I have a working Angular 9 project that I have setup to emit a value of a userProfile component that contains the details of Name, Job and bio.

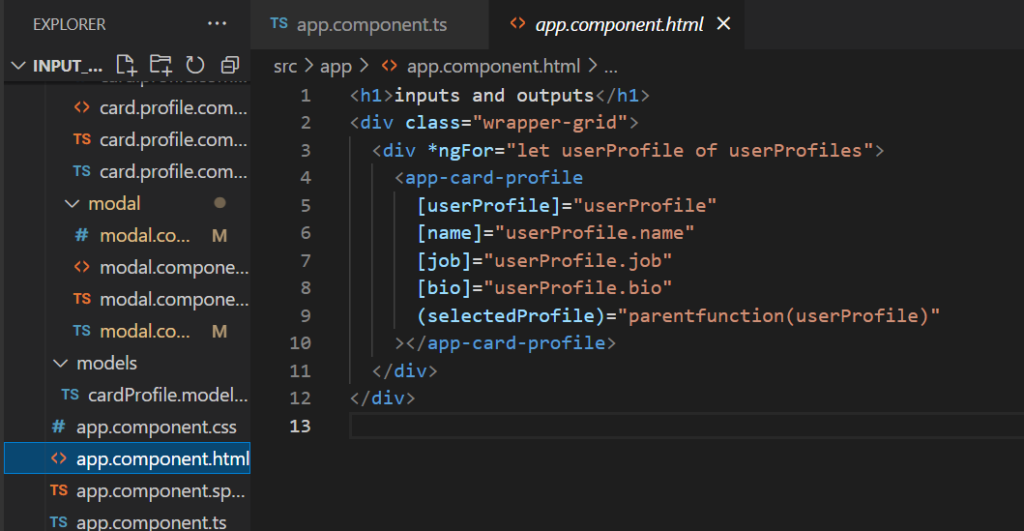
I was thinking of going through the code line by line but you’ll need to pass data to the component and through the emitter the function will emit the value to the parent component and now to create the component instance. So in the view you can see I’m using the event emitter value from the card profile component, so
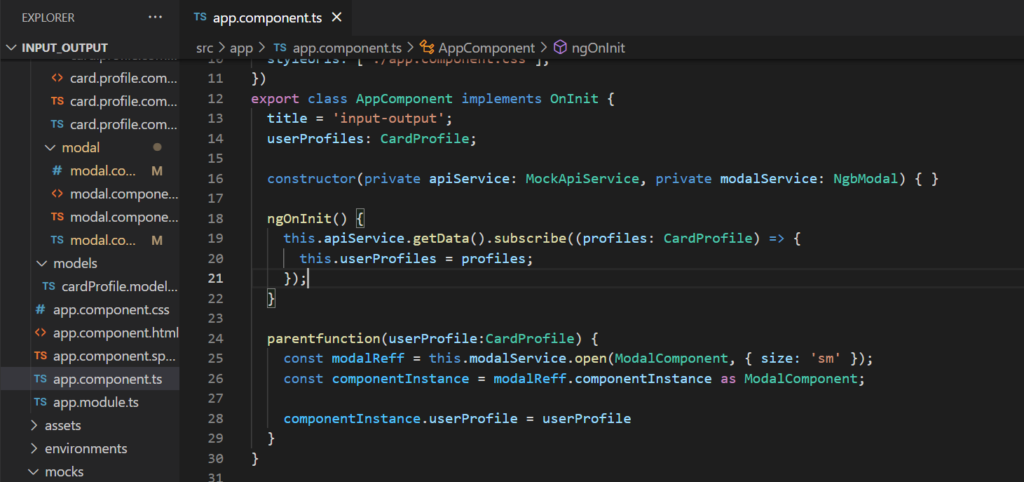
this ‘(selectedProfile)= parentFunction(userProfile)” is going to help us create this component instance of the bootstrap modal in the main app component .

  parentfunction(userProfile:CardProfile) {
    const modalReff = this.modalService.open(ModalComponent, { size: 'sm' });
    const componentInstance = modalReff.componentInstance as ModalComponent;

    componentInstance.userProfile = userProfile
  }

The above is where the magic happens, upon clicking the parentFunction it’ll create a const modalReff. from there you can reference the componentInstance and should have access to the ModalComponent’s inputs and variables.

Granted its a bit of setup work but this is how one would use a component instance in a project

If you have any issues you can check out the working sample project right here

this carries examples of inputs and outputs

How OAuth 2.0 and OpenID connect work

I was shared this video for a tech discussions and I have learned so much from this man. I wanted to add some personal notes below but its actually a fair amount to digest. Enjoy the video and get ready for the flow of knowledge coming your way.