TLDR below, as for now work has been more challenging and only now i’ve started working on some personal projects..well just project.
To become more familiar with firebase I went through this tutorial and it gets you up and connected. Also shows you the basic crud calls which is handy.
I started a new project and tried to follow the tutorial and I wanted to firebase init but the command was not found. Seeing that i’ll probably come across this again i have decided to make a lil dev note on this.
TLDR
Macbook:projectName tony$ firebase init
 -bash: firebase: command not found
Macbook:projectName tony$ npm install -g firebase-tools
Install firebase tools globally by installing the following rpm package
npm install -g firebase-tools
There is also a chance that you are not signed into firebase yet. The terminal should prompt you to run “firebase login”.
firebase login
After successfully logging in you can run the following command
If you want the sample main steps scroll to the “TO THE POINT” part of this article thanks. If you all good keep reading.
So this lock out isolation thing has been quite challenging for everyone and I feel your pain. I was working on an angular portfolio…but its been mainly css when trying to cater for mobile view and tablet view…so I want to take a break from the css and get into interacting with an API
If you don’t know what an API is…this wont cover the fundamentals sadly, it’ll be a working example of an api request. As for now we are Focusing on Angular working with APIs using services.
There are many free open API sites the one i came across apifootball.com where upon registering they’ll provide you with an API key (you’ll need to keep this safe and secure) From my experience most of the free apis require a registration.
We have an api and an api key, now you want to check and see if we can make a call of some sort and log a response. A great API tool is postman. Basically setup the API call to your liking and it allows you to see and track the response and what not, look its great.
ok so that is the long of it. Now i’m going to try to keep it as short as possible. Yes that does say “overal_league_payed” learned that the hard way.
TO THE POINT HOW TO SETUP TO HIT AN API
Using the angular cli we can just enter the following command in the terminal
// short hand
ng g s serviceName
// full on
ng generate service serviceName
The command will generate a service for you in your solution. Basic boiler plate.
Right now you know your API is working. Let’s make that service in our angular app give that API a call and see if we can get their response.
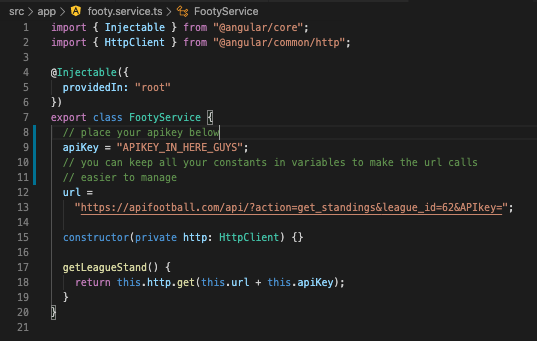
Make sure that you are using HttpClient for the http calls. I normally use the below structure for api calls. Adding variable for base urls and other things that are constant like my apiKey this is just personal preference.
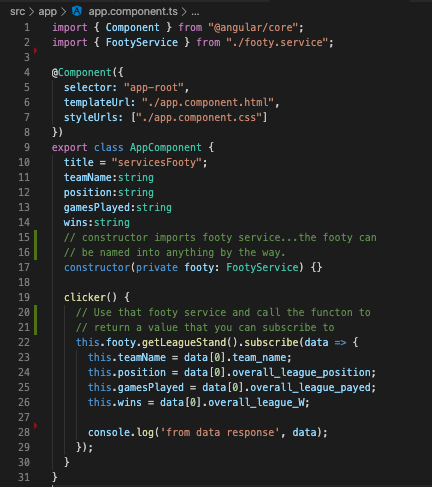
I was advised that when it comes to services, make sure they only deliver the data keep that part clean. Now moving along to the app.component we’ll need to create a function that hits that service and the getLeagueStand and subscribe to the response and then extract the data you want. Make sure you return the url.
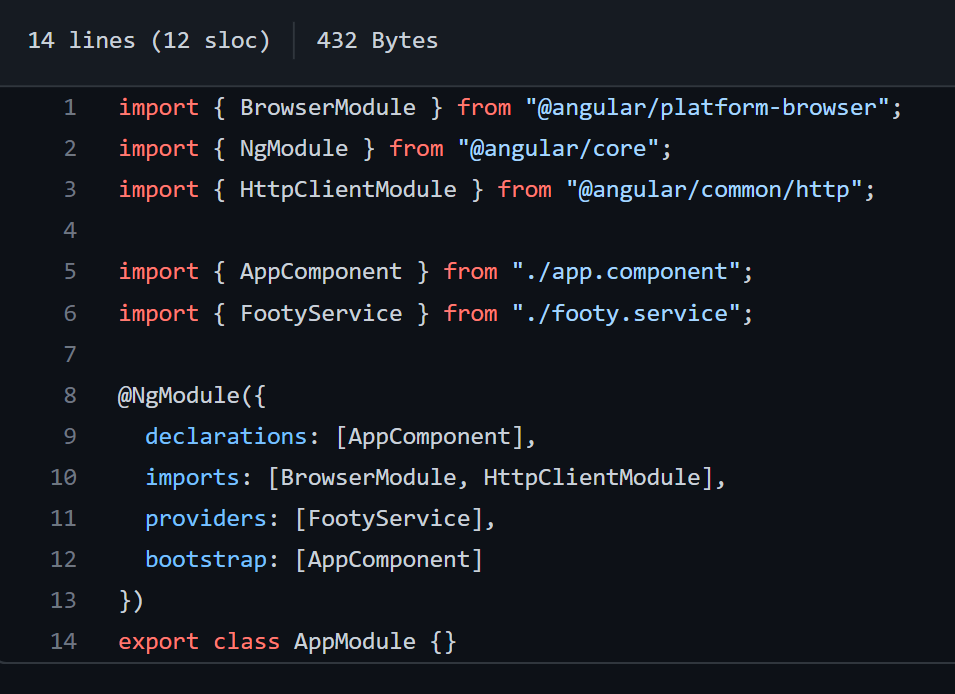
And ALSO do not forget to import your service and the httpClient module to your app.module file like so…I can’t believe I forgot to add this guy.
As you can see in the code above we subscribing to the data and then setting out its values to variables. Here is a repo to a working sample. You’ll need to add your own apikey though.
Alright alright, it has been a long time. Now it’s time to take you through how to add a toast notification and fast.
The quickest and easiest way I could find was using this lil npm package from ngx-toastr is what you need for a quick and simple implementation.
Following the guide and going through the steps its pretty straight forward, but if you are having any troubles like i have…on that one time, i’m happy to share my findings.
Step one:
npm install ngx-toastr --save
// and if you already have it installed
npm install @angular/animations --save
Cool so let that little console run. Once installed be sure to add the imports to your app module like so
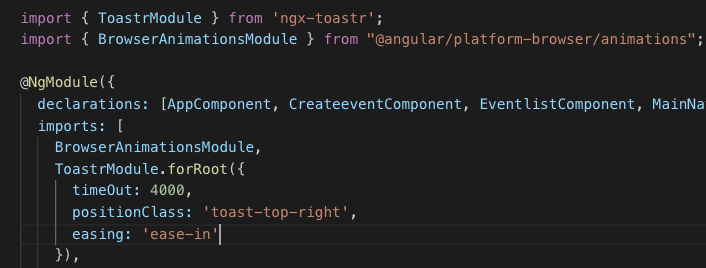
Add them imports to your app.module.ts
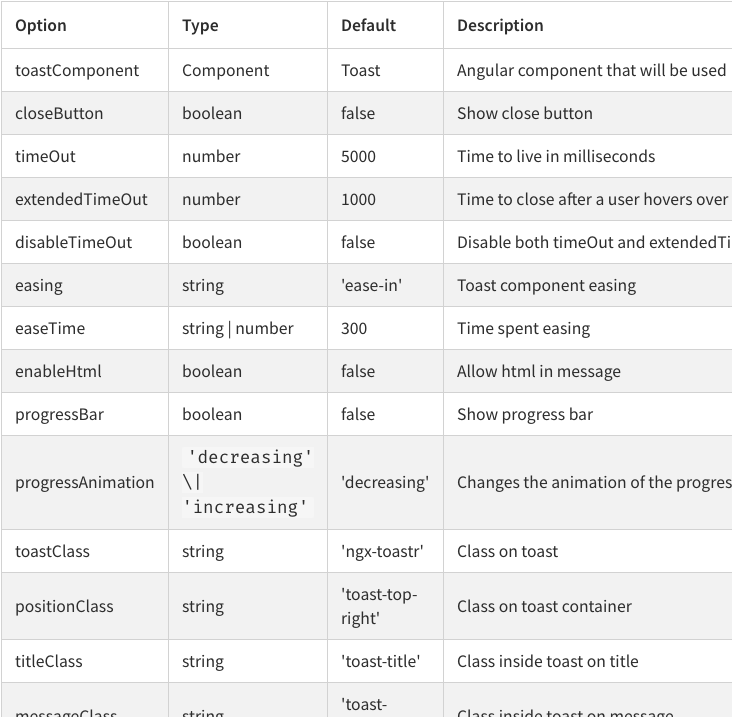
As you can see I have added something a little extra to the ToastrModule.forRoot({}), in those brackets you can do a number of tricks, adjust positioning animation and the works here are some details
Now you need to add the stylings so the app knows how to make your toastie look good, check out your styles.css the main one ya’ll know what i’m talking about. You have a number of styling imports. This is where you need to be a tiny bit careful and note what style libraries you are using is it Bootstrap? Angular material? is it something else? Luckily we can do an import for whatever your style framework that you have implemented.
// regular style toast
@import '~ngx-toastr/toastr';

// bootstrap style toast
// or import a bootstrap 4 alert styled design (SASS ONLY)
// should be after your bootstrap imports, it uses bs4 variables, mixins, functions
@import '~ngx-toastr/toastr-bs4-alert';

// if you'd like to use it without importing all of bootstrap it requires
@import '~bootstrap/scss/functions';
@import '~bootstrap/scss/variables';
@import '~bootstrap/scss/mixins';
@import '~ngx-toastr/toastr-bs4-alert';
So the problem i was facing was that i have implemented the toast notifications and all but they were not displaying. Turns out i was not using the correct toastr import styles. So lil lesson for me be sure to take note on what styling framework/libraries you are using. I used the regular toast implementation.
For my implementation of the toast notifications i wanted to add it as a service/shared component so it can be reused throughout the app..well “web-app” I am making, it looks a lil something like this (toast-message.service.ts).
this way i’m able to inject this service into the constructor and utilise my toastie notifications for both success and error scenarios also having the freedom of adding my own text for the success/failure situation.
import { ToastMessageService } from "../../services/toast-message.service";
export class SomeCoolComponent implements OnInit {
  constructor(private toastr: ToastMessageService) {}

ngOnInit() {
this.toastr.showSuccess(
           // Body content of toastie
           "Has been successfully created.",
           // Header of toastie
            "A Toast notification"
          );
this.toastr.showError(
           // Body content of toastie
           "Has been successfully created an error.",
           // Header of toastie
            "A Toast notification for the masses and friends"
          );
}
}
I think that that about does it. This should be quick and simple, my project is running Angular 7. Lemme know if you come across any issues.