Hi all, this is just my personal dev notes that I keep here so I can get a reminder from time to time. I’ve recently started to play around with Mongdb with great success using the MEAN stack approach, so I wont be going through the setting up but just some basic commands to get you going and started.
RUN COMMAND
mongo
CREATE A NEW TABLE COMMAND
use DBNAME
Once successful you will see the command line mention that you have “switched to db DBNAME”
SHOW DATABASE LIST COMMAND
show dbs
The terminal will list the available databases.
INSERT DOCUMENT INTO DATABASE
db.DBNAME.insert({
         firstName: "Tony",
         lastName: "Marques",
         avatar: "01"
})

// result should show
WriteResult({ "inserted" : 1 })
Hope this helps you quickly along. I am using MongoDB Compass Version 1.29.5 and node v14.18.0
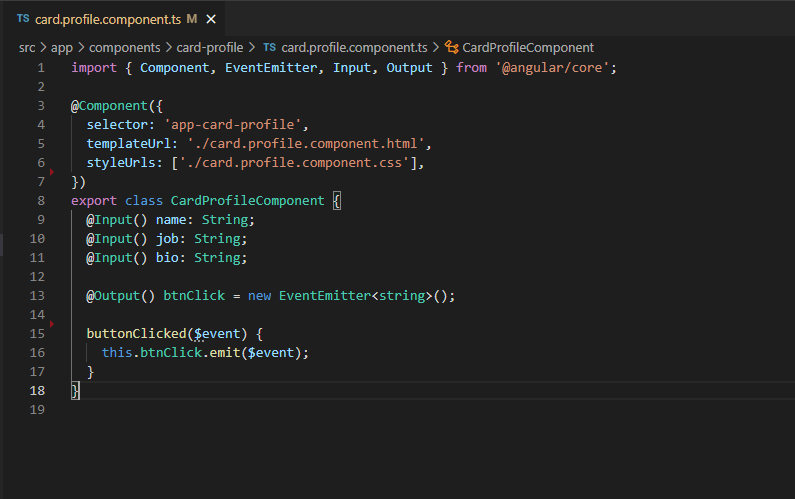
In the previous post we have covered all our inputs and you might be thinking what about @outputs, well lets make one. When you have an @output it would emit a value up to the parent component, I believe there are many ways to do this, but all I’m trying to say is that @output requires at least an emmitter. As seen in the card.profle component. (picture below).
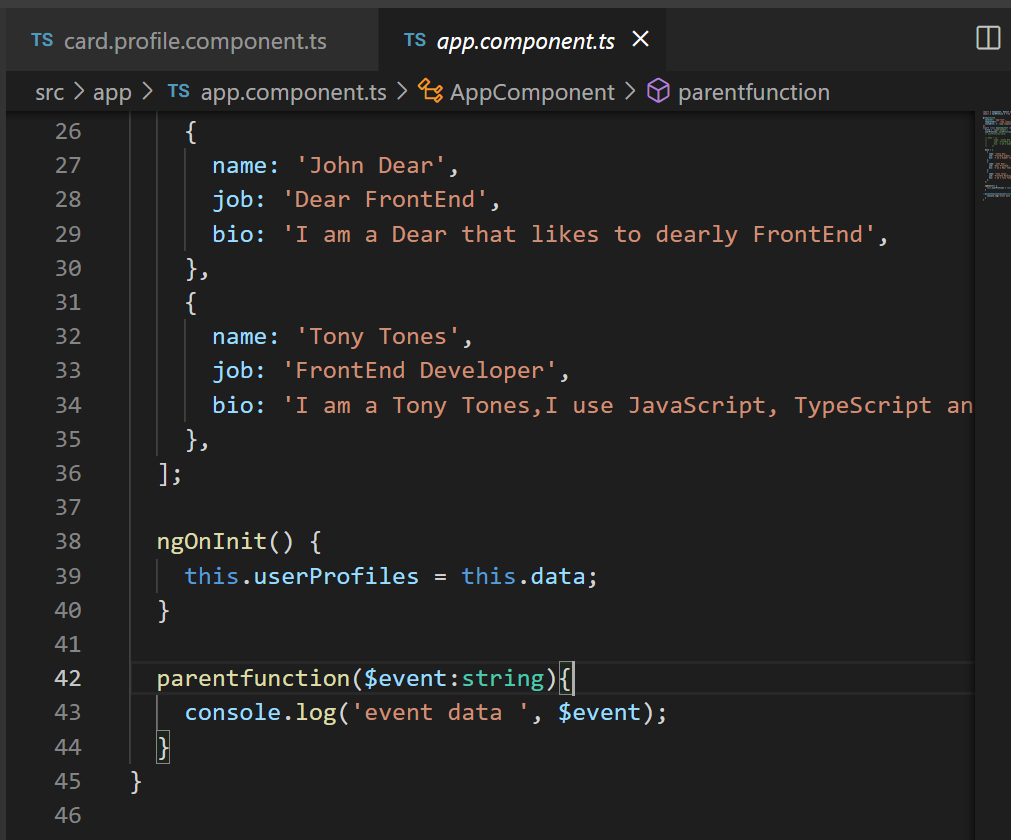
Update the following code in the app.component.ts file:
  data = [
    {
      name: 'Jonny Doe',
      job: 'FrontEnd Gopher',
      bio: 'I am a Gopher that likes to FrontEnd Gophe',
    },
    {
      name: 'John Dear',
      job: 'Dear FrontEnd',
      bio: 'I am a Dear that likes to dearly FrontEnd',
    },
    {
      name: 'Tony Tones',
      job: 'FrontEnd Developer',
      bio: 'I am a Tony Tones,I use JavaScript, TypeScript and Angular Framework',
    },
  ];

  ngOnInit() {
    this.userProfiles = this.data;
  }
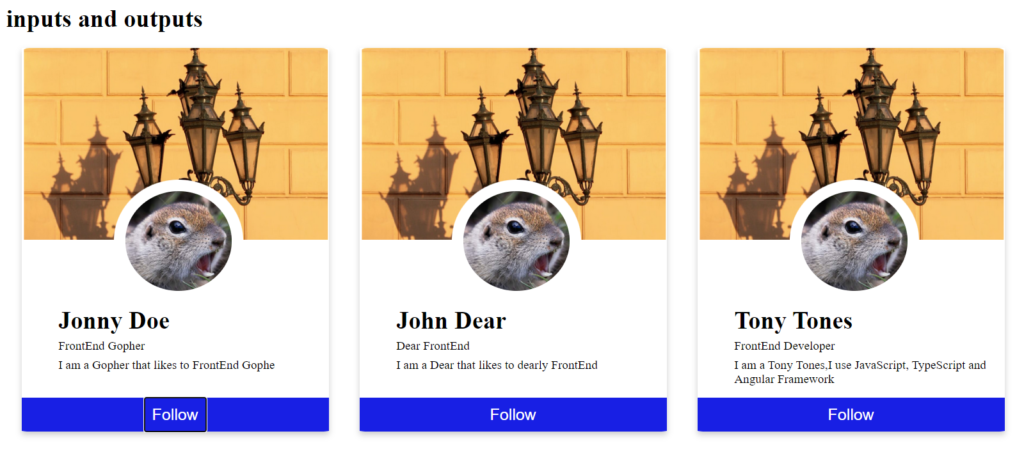
Refresh and you should have 3 loverly gophers staring at you.
In this example we will link the follow button to emit the username of the profile selected to the parent component. This exercise we will use the eventmitter to help us emit the profile name selected to the parent component.
Line 13 we have our @output named btnClick connected to our new eventEmitter of type string (for our name variable).
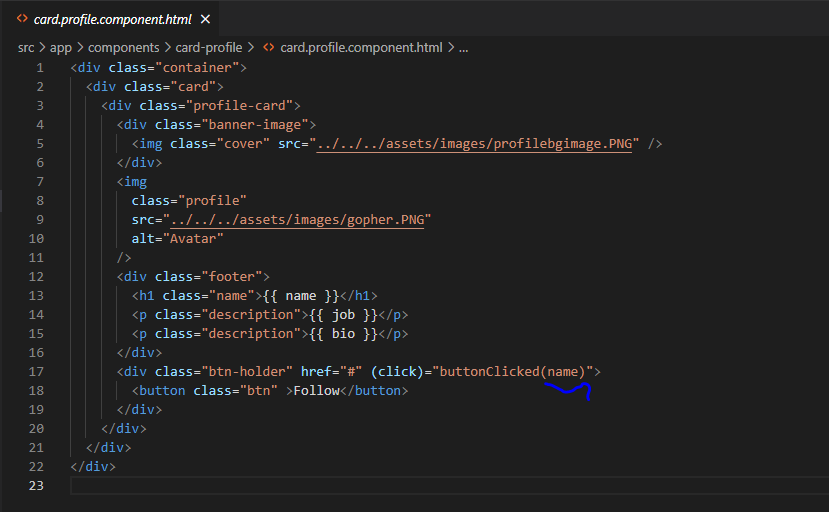
We use the buttonClicked() function and pass the variable name in the buttonClick(name), which we have declared in our cardprofile component and the next step is to link it on the app.component.html and you can see the emitter btnClick.
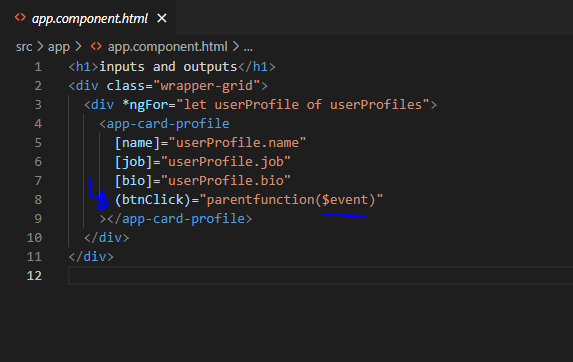
And finally to add the function in the app component
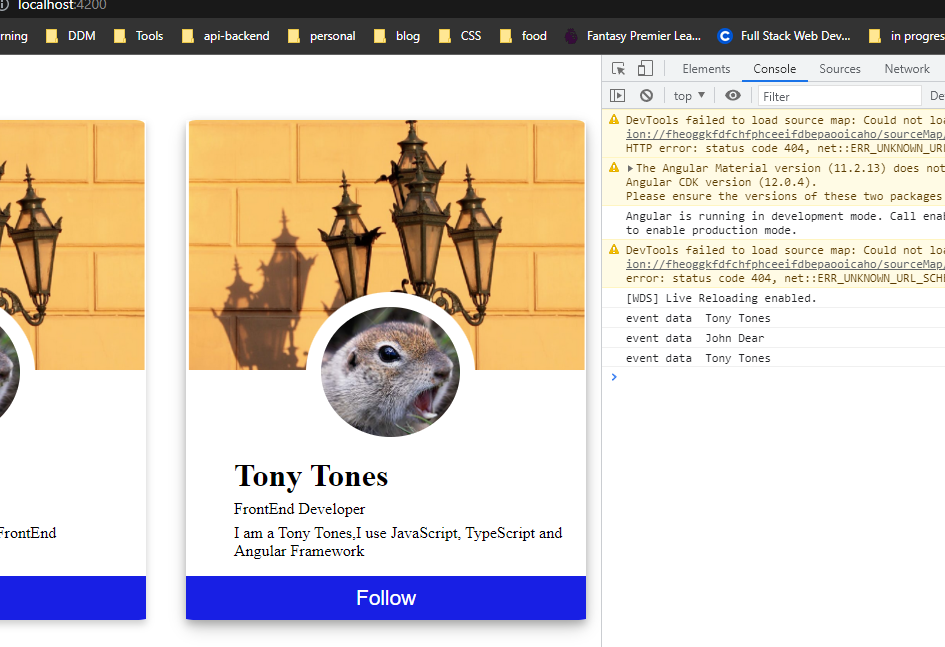
Now spin up the project and open the dev tools and click on one of the profiles.
Here we are console logging the profile username to the parent component and thats about it.
When you are starting you just don’t know what you can do at times. I have been in a situation where I already have a file on where I want to put my new Angular project but sadly my folder structure gets messed up completely.
POST note: You will need to have installed the Angular CLI first before doing this step.
So use this command line below to create an Angular project and place said project into a specific directory of your choosing:
TLDR
ng new angular-project --directory=./new-angular-project-file
This should sort you out. In development its important to keep your work space clean especially your git repo. It doesn’t reflect well if your repo is being reviewed or checked out.
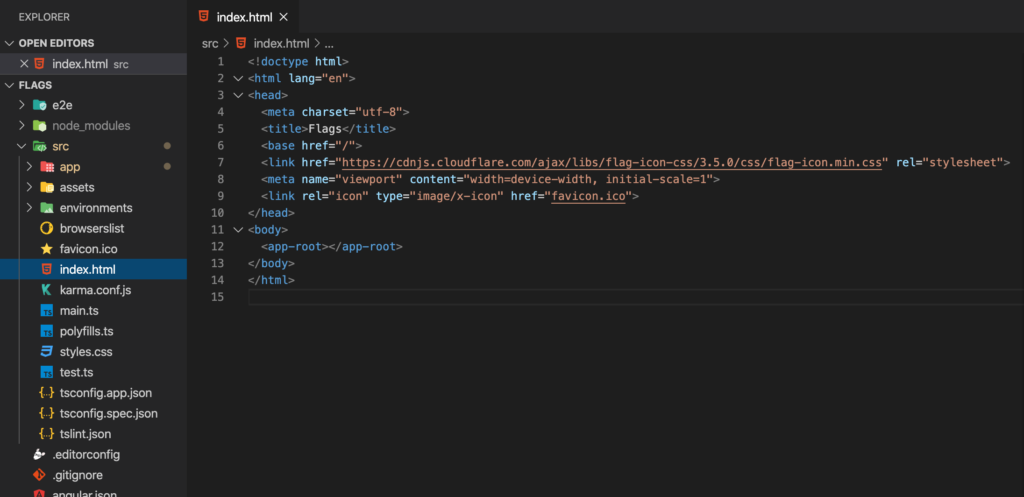
// Lists country flags
<div *ngFor="let country of countries">
      <ul>
        <li class="item">
          <a class="flag-icon flag-icon-{{ country.code }}"></a>
          {{ country.name }}
        </li>
      </ul>
    </div>
// Hardcode flag
<div>
 <a class="flag-icon flag-icon-za></a>
</div>
The above sample code will list some flags that have been populated by the countries array. Here is a countries array I made you can use to get started.
I was shared this video for a tech discussions and I have learned so much from this man. I wanted to add some personal notes below but its actually a fair amount to digest. Enjoy the video and get ready for the flow of knowledge coming your way.
Alright alright, it has been a long time. Now it’s time to take you through how to add a toast notification and fast.
The quickest and easiest way I could find was using this lil npm package from ngx-toastr is what you need for a quick and simple implementation.
Following the guide and going through the steps its pretty straight forward, but if you are having any troubles like i have…on that one time, i’m happy to share my findings.
Step one:
npm install ngx-toastr --save
// and if you already have it installed
npm install @angular/animations --save
Cool so let that little console run. Once installed be sure to add the imports to your app module like so
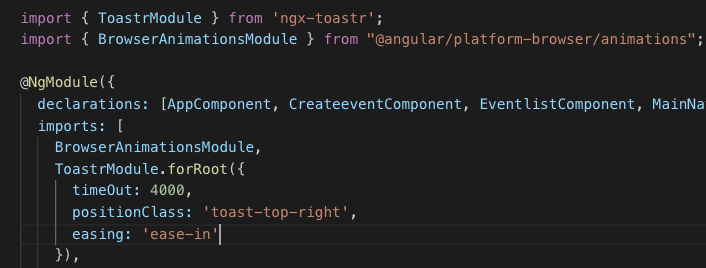
Add them imports to your app.module.ts
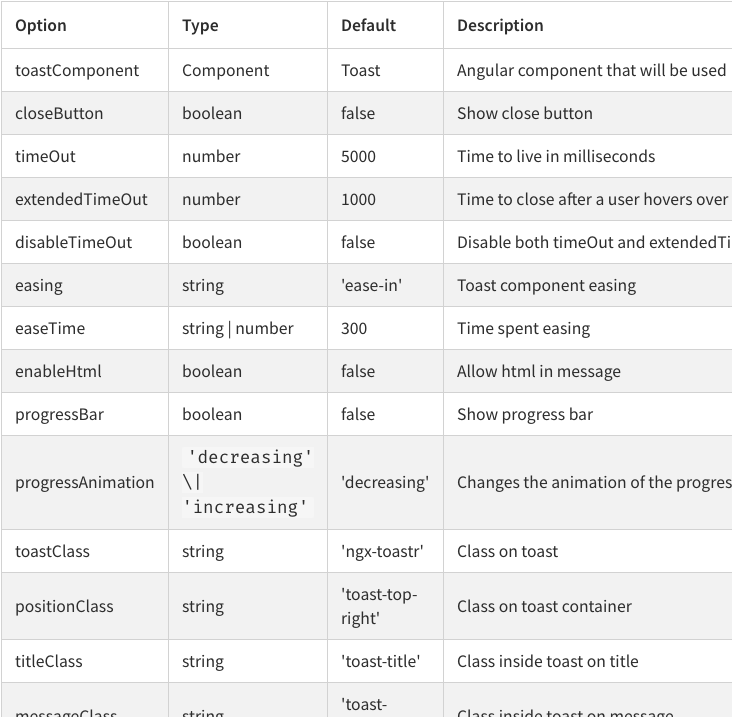
As you can see I have added something a little extra to the ToastrModule.forRoot({}), in those brackets you can do a number of tricks, adjust positioning animation and the works here are some details
Now you need to add the stylings so the app knows how to make your toastie look good, check out your styles.css the main one ya’ll know what i’m talking about. You have a number of styling imports. This is where you need to be a tiny bit careful and note what style libraries you are using is it Bootstrap? Angular material? is it something else? Luckily we can do an import for whatever your style framework that you have implemented.
// regular style toast
@import '~ngx-toastr/toastr';

// bootstrap style toast
// or import a bootstrap 4 alert styled design (SASS ONLY)
// should be after your bootstrap imports, it uses bs4 variables, mixins, functions
@import '~ngx-toastr/toastr-bs4-alert';

// if you'd like to use it without importing all of bootstrap it requires
@import '~bootstrap/scss/functions';
@import '~bootstrap/scss/variables';
@import '~bootstrap/scss/mixins';
@import '~ngx-toastr/toastr-bs4-alert';
So the problem i was facing was that i have implemented the toast notifications and all but they were not displaying. Turns out i was not using the correct toastr import styles. So lil lesson for me be sure to take note on what styling framework/libraries you are using. I used the regular toast implementation.
For my implementation of the toast notifications i wanted to add it as a service/shared component so it can be reused throughout the app..well “web-app” I am making, it looks a lil something like this (toast-message.service.ts).
this way i’m able to inject this service into the constructor and utilise my toastie notifications for both success and error scenarios also having the freedom of adding my own text for the success/failure situation.
import { ToastMessageService } from "../../services/toast-message.service";
export class SomeCoolComponent implements OnInit {
  constructor(private toastr: ToastMessageService) {}

ngOnInit() {
this.toastr.showSuccess(
           // Body content of toastie
           "Has been successfully created.",
           // Header of toastie
            "A Toast notification"
          );
this.toastr.showError(
           // Body content of toastie
           "Has been successfully created an error.",
           // Header of toastie
            "A Toast notification for the masses and friends"
          );
}
}
I think that that about does it. This should be quick and simple, my project is running Angular 7. Lemme know if you come across any issues.
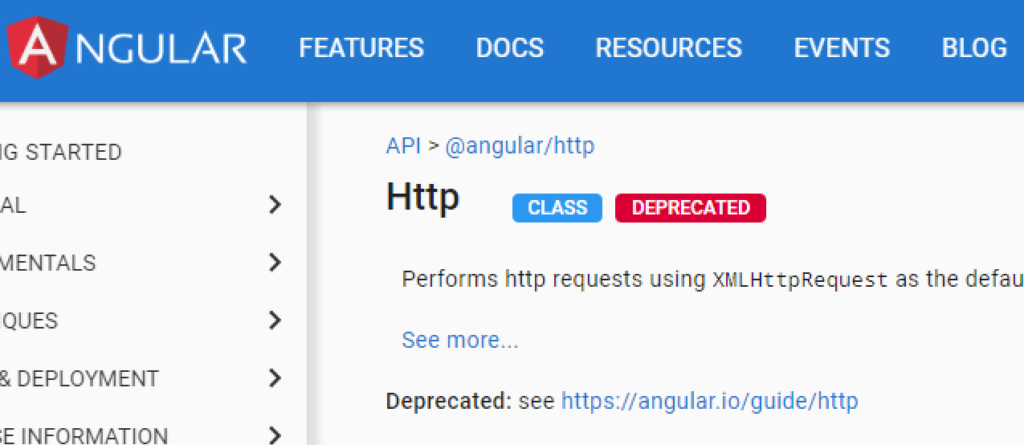
I know that this post is a little click batey, but I was in a total shock when I heard the news and you won’t believe what happened next.
Angular developers are outraged, I think
You may be asking when did this happen ( 20 Aug 2017 apparently) and what am i supposed to do now, I’ve got this tutorial that I’m following but this geyser is using Http!
Don’t stress, Angular is now using an improved method to handle HTTP requests using HttpClient. I’m going to go over some basics.
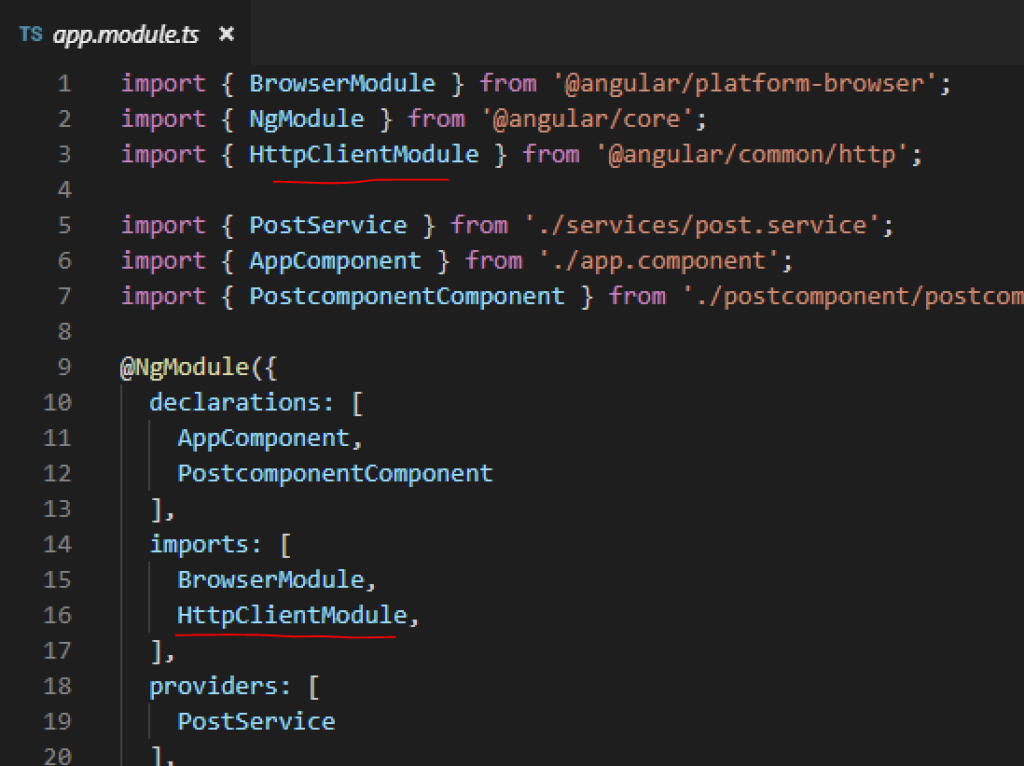
Firstly you will need to add HttpClient to your app.model.ts file in the imports section. You may be asking do I have to, my reply is if you want this to work yes.
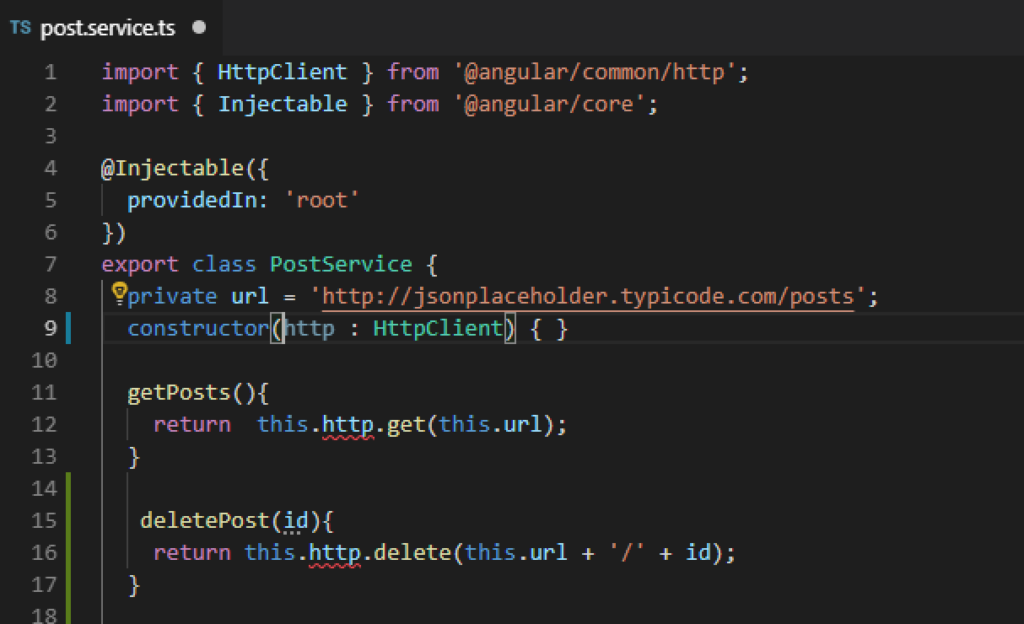
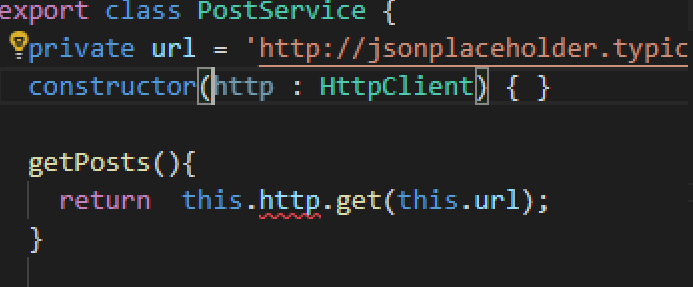
Cool, so with that done we have access to all the HttpClientModule’s tricks. I have created a service component to show off my http skills, be sure to import the httpClient as …HttpClient on top of your typeScript file like so.
So you’ve happily imported your HttpClient, and created your constructor with (http: HttpClient). Now you’re seeing a compile error and thinking…
what is dees?!
If you add a “private” in the constructor you will see that the http will be available throughout that specific ts file and the compile error will magically disappear , so do not stress.
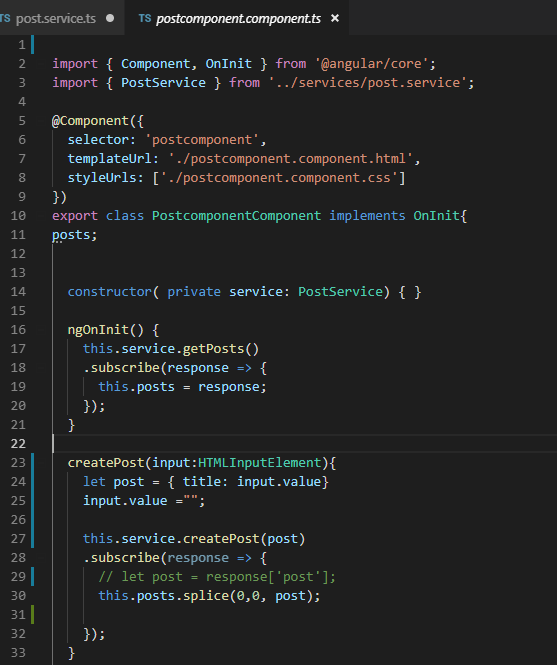
You may not have tried using a service components, this is just to clean up your code and put it into good reading order. Best practice for api calls to be located into these service component files. As you can see in the screenshot below that i reference the service call to get access to the api calls for my application.
i.e. be sure to not share end points to the public, but this end point is for practice and funzies so knock yourself out with jsonplaceholder.typicode.com
For more information about httpClient be sure to checkout Angular docs.