Working with component instances & @ng-bootstrap’s pop up modal

pop up modal

I’m gonna cut to the chase, so no story time here.

First off here is the documentation for the @ngbootrap Modal !

To install and setup first
run this command line to get access to the @ng-bootstrap/ng-bootstrap node modules.

npm i @ng-bootstrap/ng-bootstrap

Once you have installed the files make a new component for the Modal itself

You would need to import the NgbModal with the line below.


// import into modal.component.ts file
import { NgbModal } from '@ng-bootstrap/ng-bootstrap';

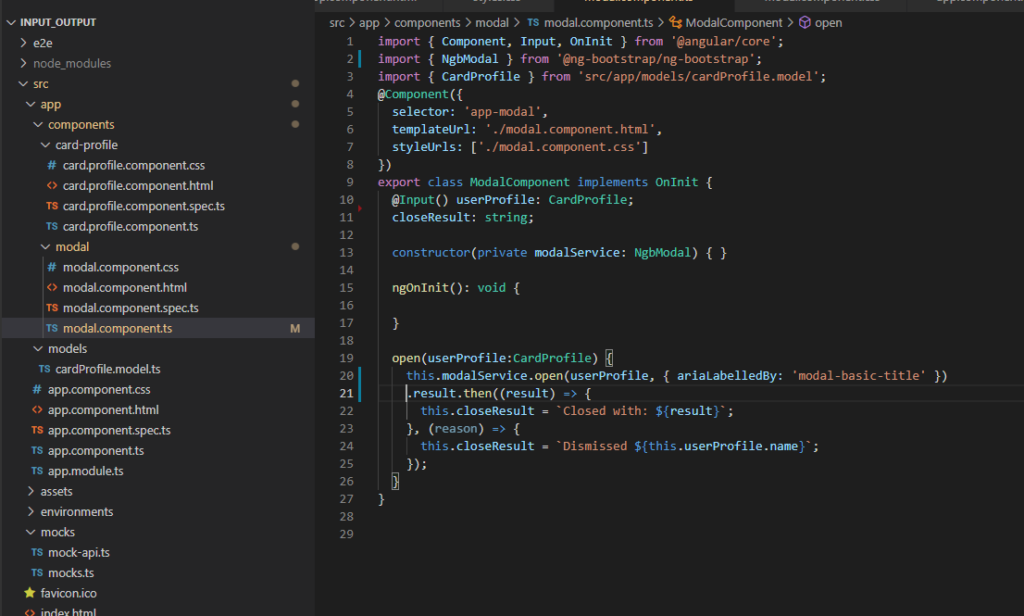
For this sample I am using the NgbModal. If you take a look at the documentation it has a list of APIs associated with the NgbModal and we are going to use some of the basic samples to get this up and running.

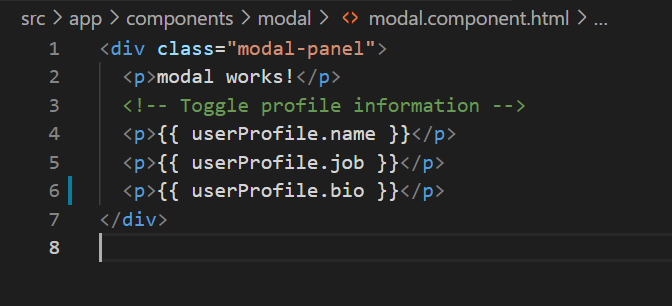
For the modal.component.html view what is nice is that you can use conditional rendering if you want to hide some of the details. or comment it out…I was having issues toggling and where to hide and show these details and I think this is the simplest way to manage with my specific demo project.

I have a working Angular 9 project that I have setup to emit a value of a userProfile component that contains the details of Name, Job and bio.

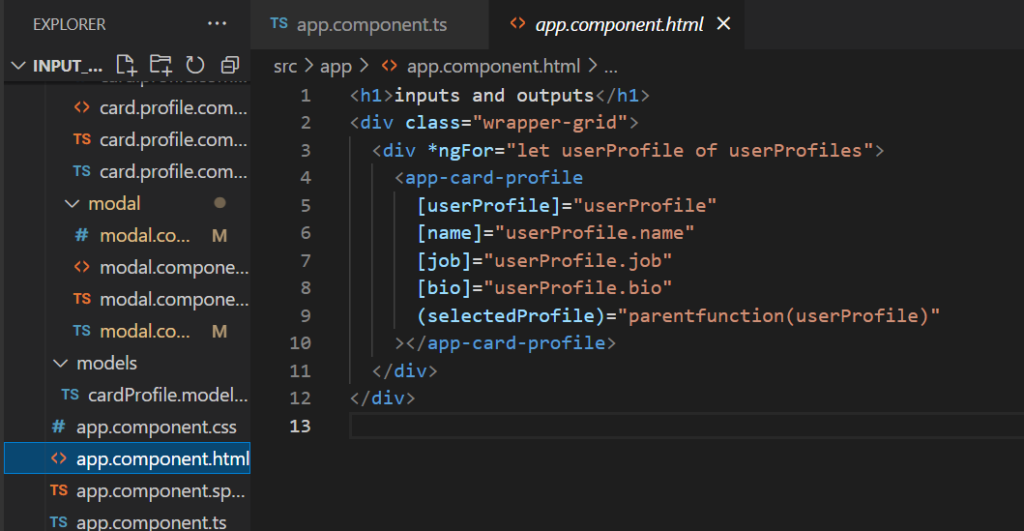
I was thinking of going through the code line by line but you’ll need to pass data to the component and through the emitter the function will emit the value to the parent component and now to create the component instance. So in the view you can see I’m using the event emitter value from the card profile component, so
this ‘(selectedProfile)= parentFunction(userProfile)” is going to help us create this component instance of the bootstrap modal in the main app component .

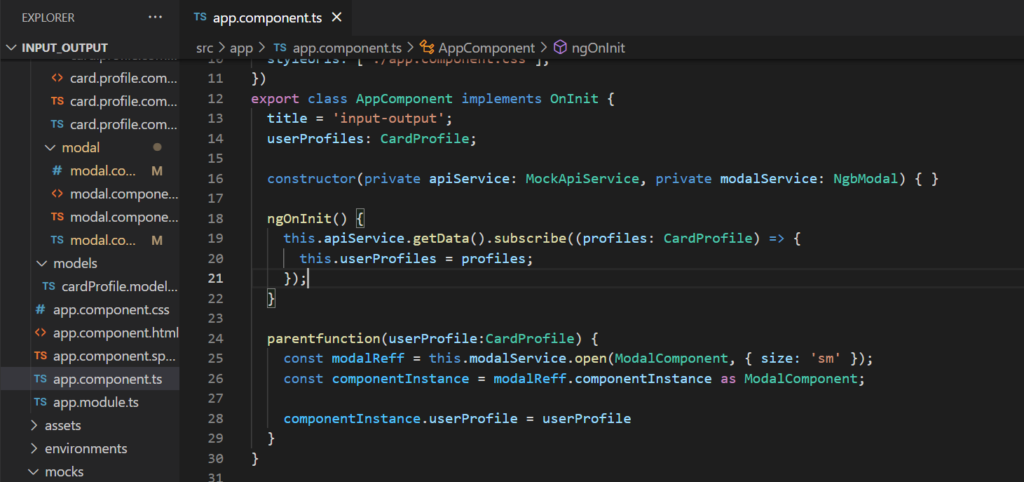
  parentfunction(userProfile:CardProfile) {
    const modalReff = this.modalService.open(ModalComponent, { size: 'sm' });
    const componentInstance = modalReff.componentInstance as ModalComponent;

    componentInstance.userProfile = userProfile
  }

The above is where the magic happens, upon clicking the parentFunction it’ll create a const modalReff. from there you can reference the componentInstance and should have access to the ModalComponent’s inputs and variables.

Granted its a bit of setup work but this is how one would use a component instance in a project

If you have any issues you can check out the working sample project right here

this carries examples of inputs and outputs

Dev Notes on Angular: Re-useable components with @Input() decorator (part 1)

Using reusable components and passing data to them. There are a number of ways to pass data to and from parent to child, but I will be focusing on the @Input and @Output decorators. I’m hoping to go through both these guys and have a working angular project with working examples with TypeScript models.

Setting up


I would start by just making a new component via the cmd.

// Generates a new component into the "components" folder.
ng g c components/cardprofile
// or
ng generate component components/cardprofile

From there you will need to build your ideal card UI and take note on what data you would like to populate into said component.

// Just add the card component selector to the app.component like so
<app-card-profile></app-card-profile>
My favorite frontEnd Gopher

Not the prettiest I’m no designer, but this is a card profile component none the less. I think its fine to start with some hard coded data. Just note the details we want to add dynamically, like Name, Job and bio.

In the card profile component i made the following object just for a single entry.


// set within the card profile component for hardcoded data
      name = 'Jonny Doe';
      job = 'FrontEnd Gopher';
      bio = 'I am a Gopher that likes to FrontEnd Gophe';

In the card.profile.component.html view I updated the fields with string interpolation for name, job, bio fields.


// card profile component html
<div class="container">
  <div class="card">
    <div class="banner-image">
      <img class="cover" src="../../../assets/images/profilebgimage.PNG" />
    </div>
    <img class="profile" src="../../../assets/images/gopher.PNG" alt="Avatar" />
    <div class="footer">
      <h1 class="name">{{ name }}</h1>
      <p class="description">{{ job }}</p>
      <p class="description">{{ bio }}</p>
    </div>
    <button class="btn">Follow</button>
  </div>
</div>

Now we have a working card that can accept values and render them in the view!

A good practice would be to create a modal for that data structure, so I made a Card interface.

export interface CardProfile {
    name: String,
    job: String,
    bio: String,
}

Implementation of @input()

Now we import our @Input() from ‘@angular/core’ for the Card component and make an @input for each piece of data we want to populate in the card component.

import { Component, Input } from '@angular/core';


@Component({
  selector: 'app-card-profile',
  templateUrl: './card.profile.component.html',
  styleUrls: ['./card.profile.component.css'],
})
export class CardProfileComponent {
  @Input() name: String;
  @Input() job: String;
  @Input() bio: String;
}

Now that we have our inputs set for the card component we’ll need to pass through the data from the app.component (Parent component) into the card component’s selector, so we’ll need to add the inputs in the card component selector as seen below <app-card-profile> is the child component and we are using it in the app.component.html.


// Add this to your app.component.html
<app-card-profile [name]="userProfile.name" 
          [job]="userProfile.job" 
          [bio]="userProfile.bio">
</app-card-profile>

Now for the data to come from the app.component.ts into the card component via the app.component.html view.

import { Component, OnInit } from '@angular/core';
import { CardProfile } from './models/cardProfile.model';

@Component({
  selector: 'app-root',
  templateUrl: './app.component.html',
  styleUrls: ['./app.component.css'],
})
export class AppComponent implements OnInit {
  title = 'input-output';

// userProfile with type cardProfile
  userProfile: CardProfile;

// object that we are going to pass into the card component
  data = {
    name: 'Jonny Doe',
    job: 'FrontEnd Gopher',
    bio: 'I am a Gopher that likes to FrontEnd Gophe',
  };

  ngOnInit() {
// setting the userProfile with the data...data
    this.userProfile = this.data;
  }
}

Now to add multiple card profiles! Lets setup the data first and make our userProfile to be userProfiles array…. which i’ll save for the next post.
If you faced any problems have a look at source code on this repo